
1、实战-docker部署twikoo-20250308(测试成功)
实战-docker部署twikoo-20250308(测试成功)
目录
[toc]
版权
警告
本着开源共享、共同学习的精神:
本文是在 博主《从 01 开始》 文章:《评论区》基础上增加了一些自己的实际操作记录和修改,内容依旧属于原作者《从 01 开始》 所有。转载无需和我联系,但请注明文章来源。如果侵权之处,请联系博主进行删除,谢谢~(这里万分感谢原作者的优质文章😜,感谢开源,拥抱开源💖)
说明:
次配置是基于自己的开源网站 《vuepress-theme-vdoing-one-public》测试的,请注意。
此模板是在Young Kbt blog的开源项目《Kele-Bingtang.github.io》基础上修改为自己的风格而成,感谢大佬开源的模板&感谢原作者开源的vdoing主题。❤️❤️
环境
twikoo version":"1.6.41
vdoing网站(vuepress)
centos7.x
docker环境- 源码
通过网盘分享的文件:2025.3.8-实战-docker部署twikoo-20250308(测试成功) 链接: https://pan.baidu.com/s/1M8stEviI2gUCmgAWU3v4lA?pwd=nef2 提取码: nef2
2025.3.8-实战-docker部署twikoo-20250308(测试成功)

前提
- 具有自己的域名、服务器、vdoing网站;
- 有手就行;
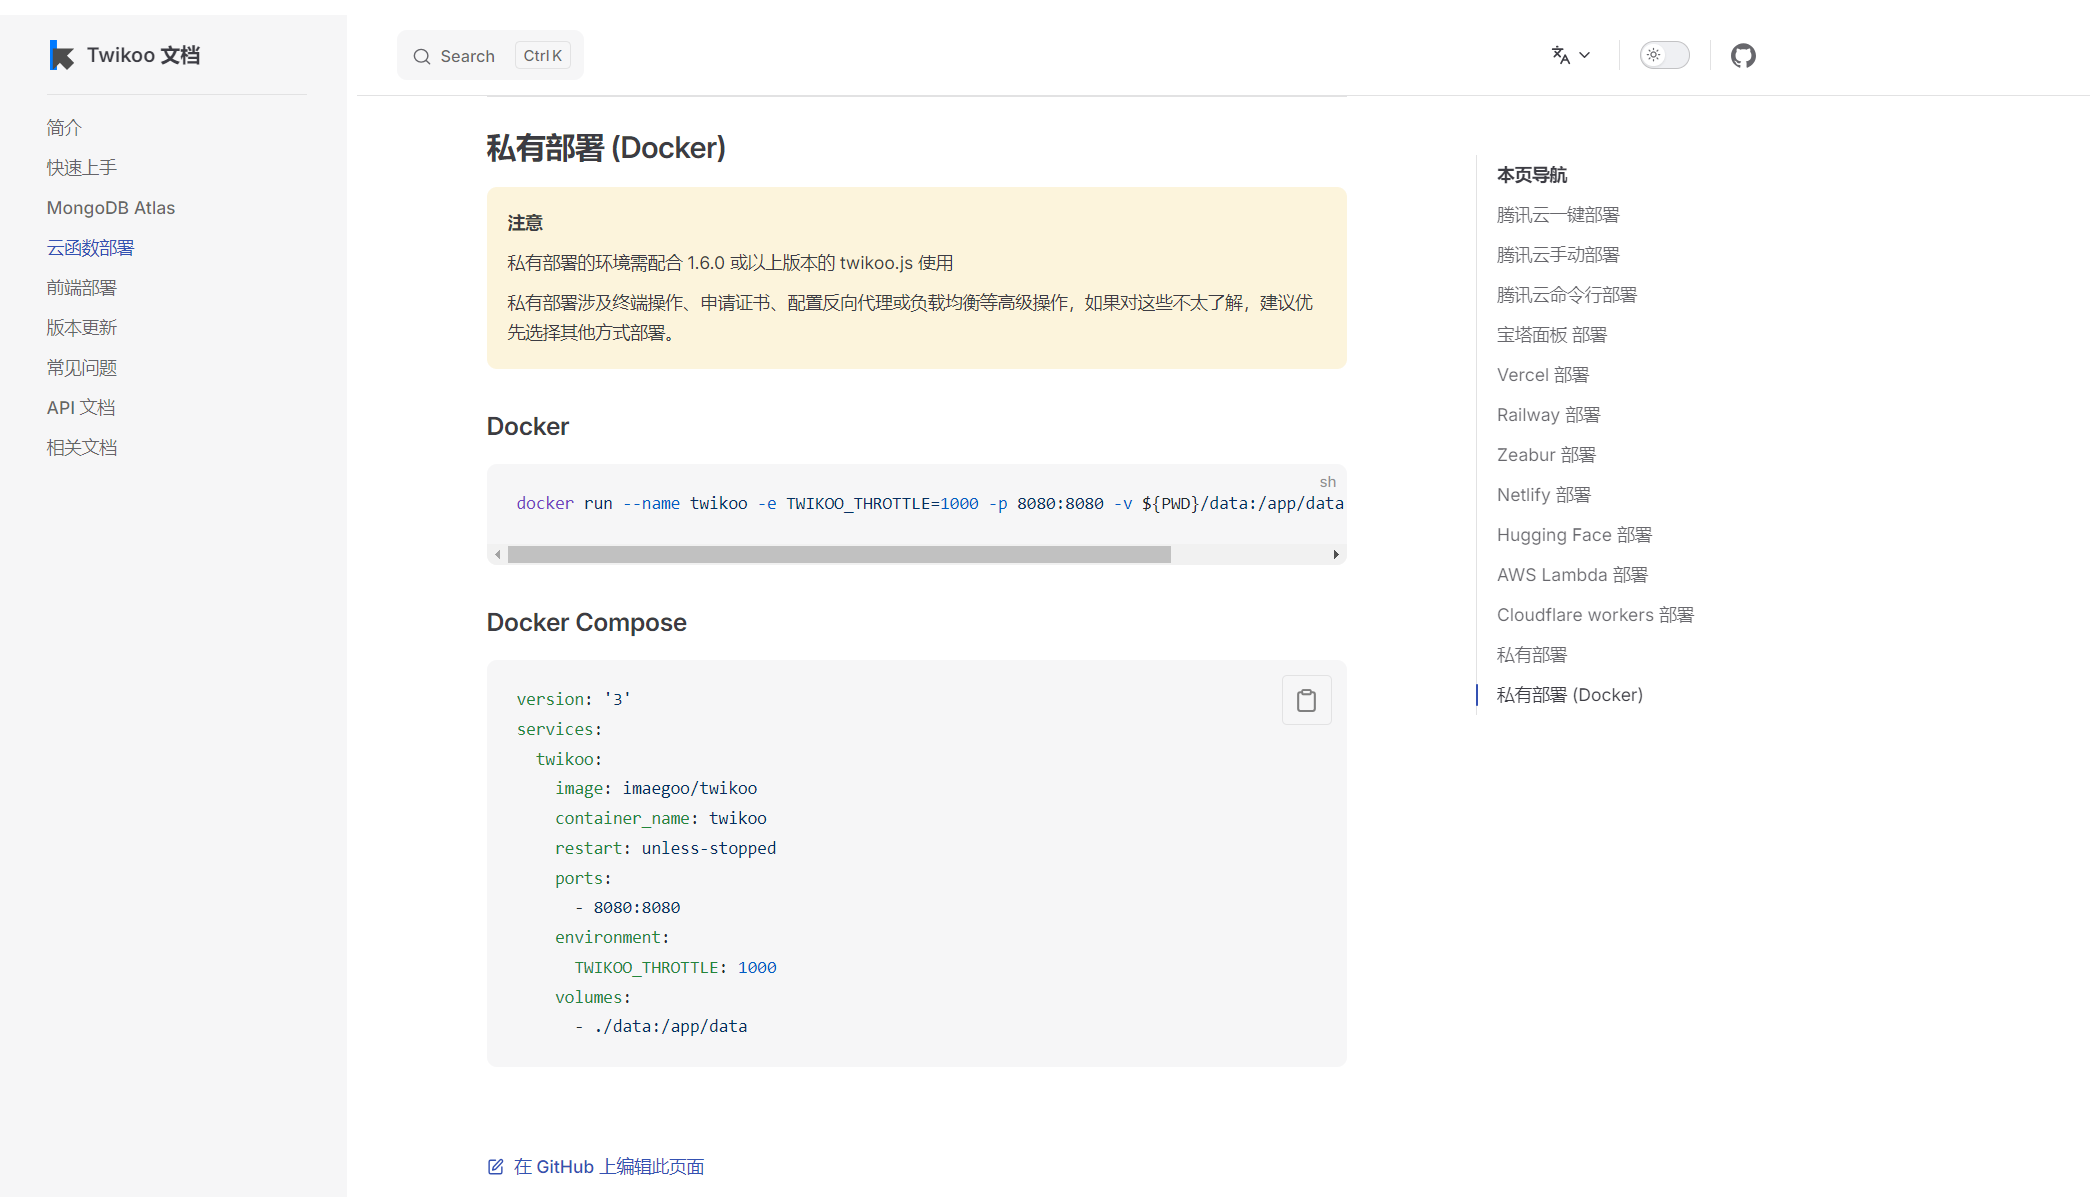
1、docker部署
- 配置
mkdir /root/twikoo
cat >>/root/twikoo/docker-compose.yaml <<EOF
version: '3'
services:
  twikoo:
    image: imaegoo/twikoo
    container_name: twikoo
    restart: unless-stopped
    ports:
      - 8080:8080
    environment:
      TWIKOO_THROTTLE: 1000
    volumes:
      - ./data:/app/data
EOF

cd /root/twikoo
docker-compose up -d- 验证
[root@wiki ~]# docker ps
CONTAINER ID        IMAGE               COMMAND                  CREATED             STATUS              PORTS                    NAMES
7ccf9098a28c        imaegoo/twikoo      "docker-entrypoint.s…"   28 hours ago        Up 17 hours         0.0.0.0:8080->8080/tcp   twikoo
[root@wiki ~]#- 扩展:docker版本
docker run --name twikoo -e TWIKOO_THROTTLE=1000 -p 8080:8080 -v ${PWD}/data:/app/data -d imaegoo/twikoo- 官方文档:
https://twikoo.js.org/backend.html

==Twikoo 目录结构:==
在私有部署的情况下,在你执行 tkserver 的时候,就会在当前目录创建:
- data 文件夹:存放评论数据、配置等
- tkserver.log:日志文件
因此,有必要在你自己指定的目录下启动 tkserver,方便后期的数据备份、日志分析等。
如果你使用的是 Docker,在上述命令里其实也用了 ${PWD}/data 来指定数据文件的目录,请自行选择。
[root@wiki ~]# cd twikoo/
[root@wiki twikoo]# ls
data  docker-compose.yaml
[root@wiki twikoo]# ls data/
db.json  db.json.0  db.json.1  db.json.2
[root@wiki twikoo]#2、配置 https
理论上这样部署,就完成后台的部分了,但鉴于我的网站用了 HTTPS,而 Twikoo 本身并不支持,因此还需要做反向代理。
接下来的步骤如下:
- 再申请和购买一个 SSL 证书
- 配置 cname
- 下载证书放到 Linux 服务器上
- 配置 Nginx 反向代理
购买 HTTPS 证书,这里我用二级域名的:

然后在云服务器控制台上配置 cname:
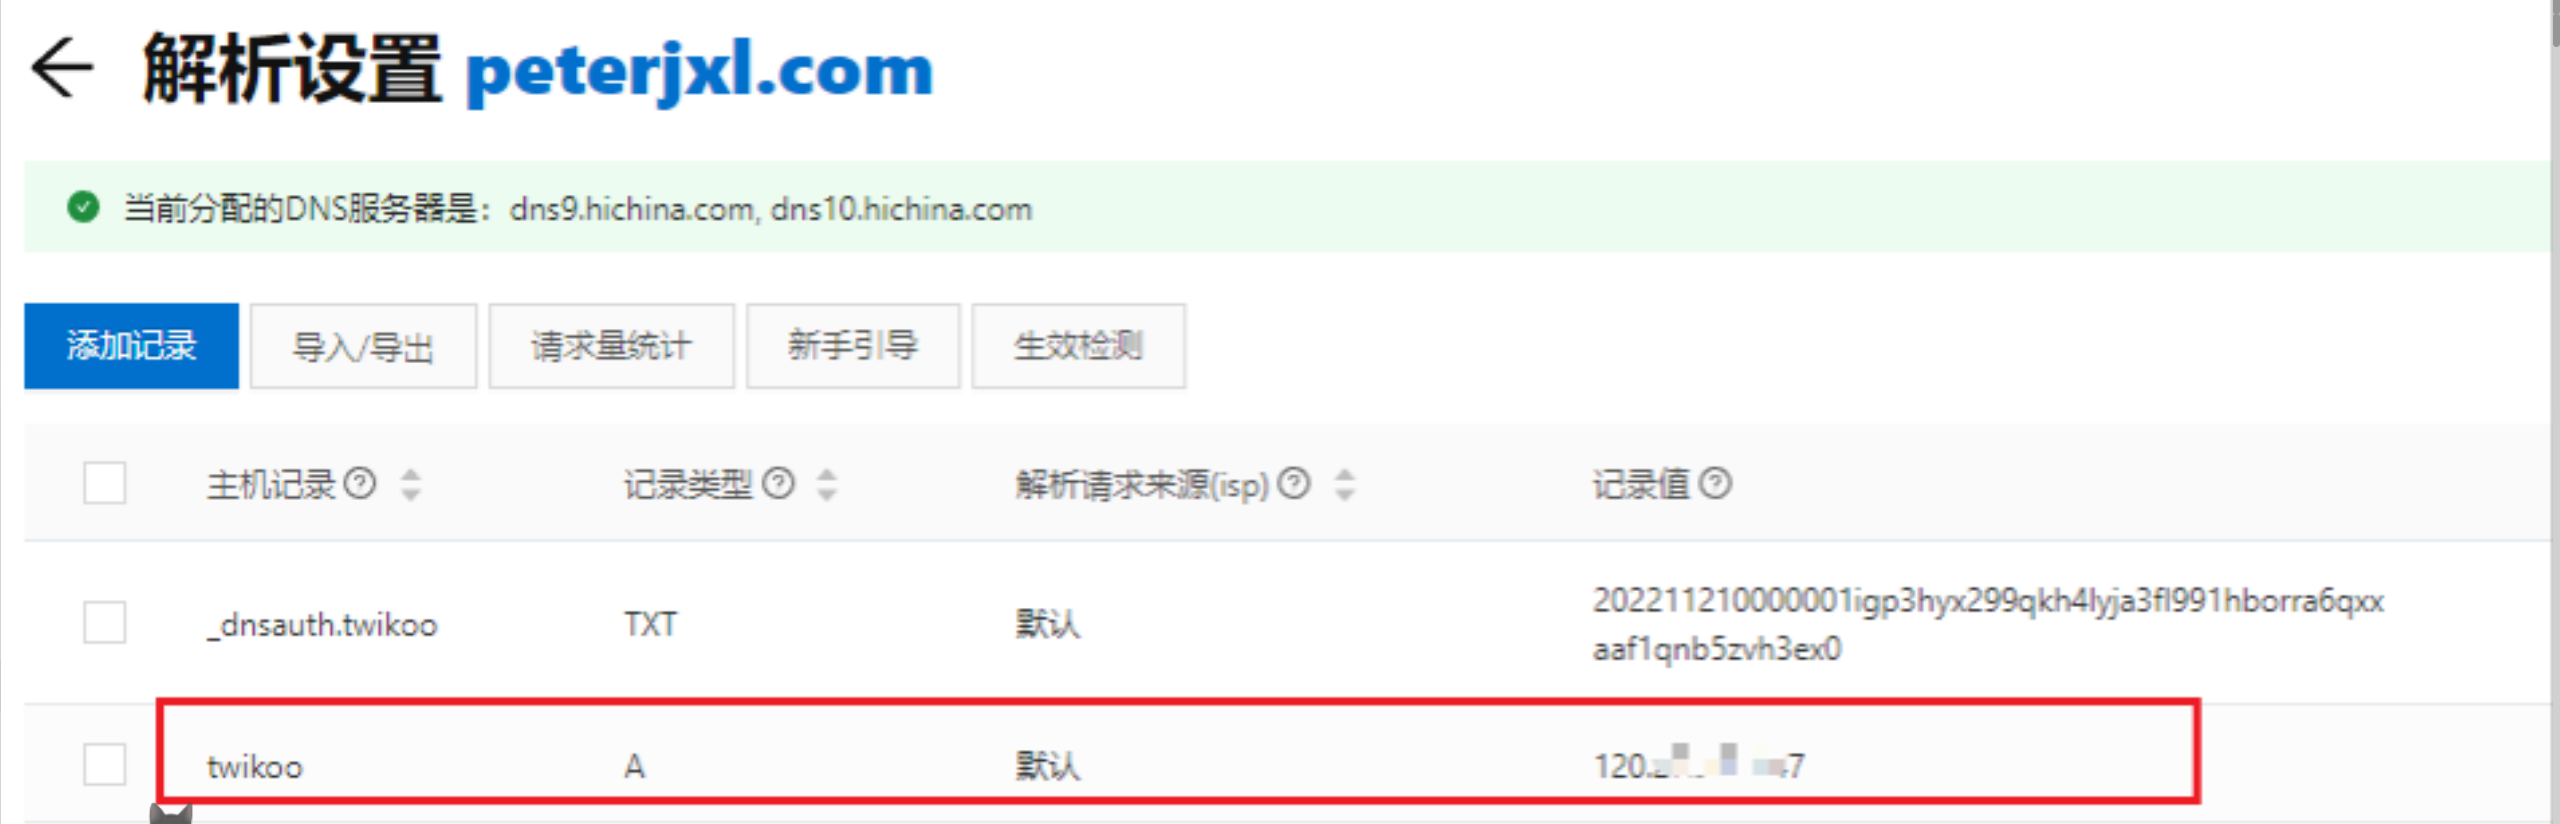
我的配置:

- 我的配置:(注意作者和我这里的配置哦😜😜😜)
cd /etc/nginx/conf.d/
vim twikoo.onedayxyy.cn.conf

[root@docusaurus-wiki conf.d]# cat twikoo.onedayxyy.cn.conf
server {
    listen 80;
    server_name  twikoo.onedayxyy.cn;
    #配置https重定向
    return 301 https://$host$request_uri;
}

server {
    listen  443 ssl;
    server_name  twikoo.onedayxyy.cn;

    location / {
        proxy_pass http://云服务器ip:8080/; # 实际的后台路径
        client_max_body_size 100M;
        proxy_set_header Host $host;
        proxy_set_header X-Real-IP $remote_addr;
        proxy_set_header X-Forwarded-For $proxy_add_x_forwarded_for;
        proxy_set_header X-Forwarded-Proto $scheme;
    }


    ssl_certificate             /etc/letsencrypt/live/onedayxyy.cn/fullchain.pem;
    ssl_certificate_key         /etc/letsencrypt/live/onedayxyy.cn/privkey.pem;

    ssl_session_timeout 5m;
    ssl_protocols TLSv1.1 TLSv1.2 TLSv1.3;
    ssl_ciphers EECDH+CHACHA20:EECDH+AES128:RSA+AES128:EECDH+AES256:RSA+AES256:EECDH+3DES:RSA+3DES:!MD5;
    ssl_prefer_server_ciphers on;
    add_header Strict-Transport-Security "max-age=31536000";

    access_log /var/log/nginx/photo.onedayxyy.cn.https.log;
}

nginx -t- 重启下nginx
nginx -s reload
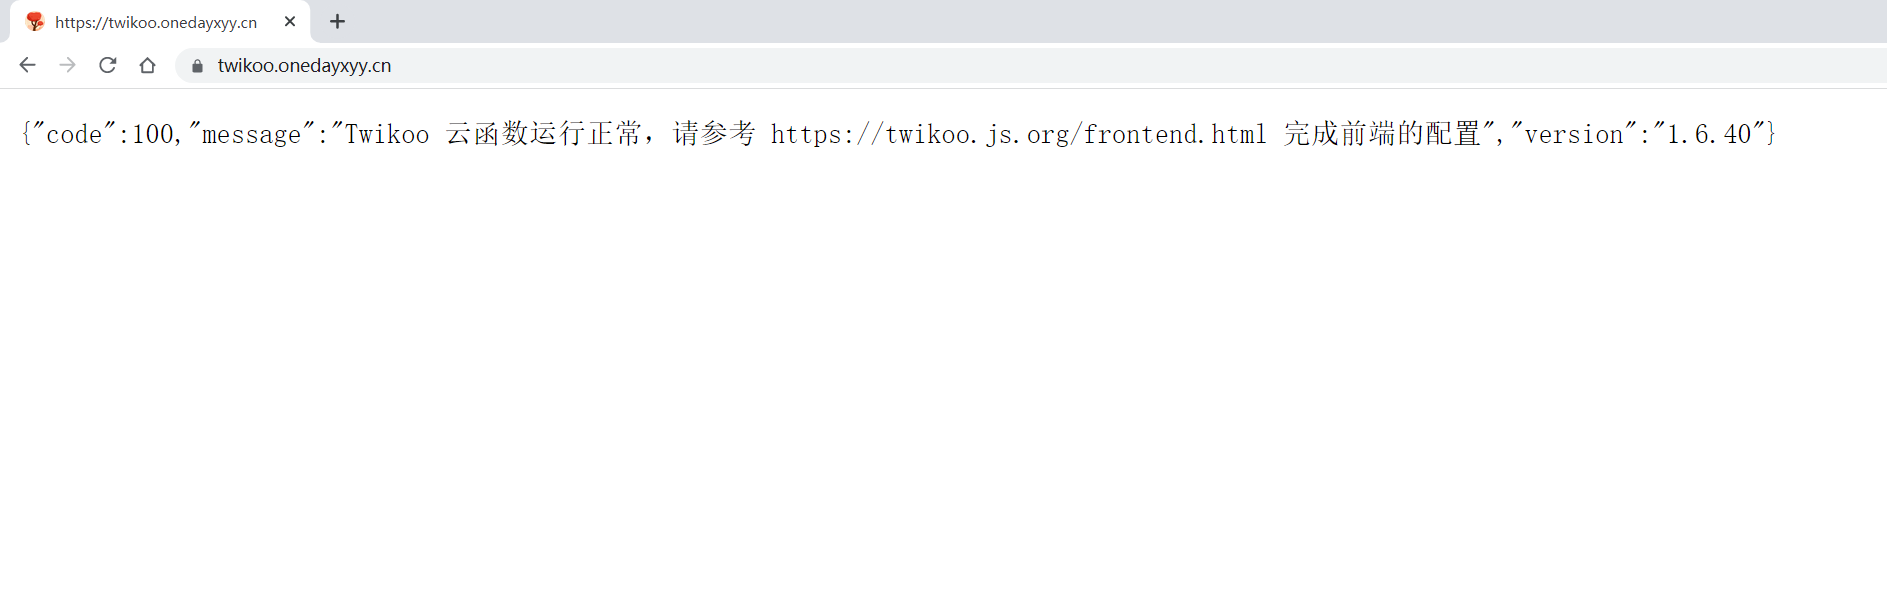
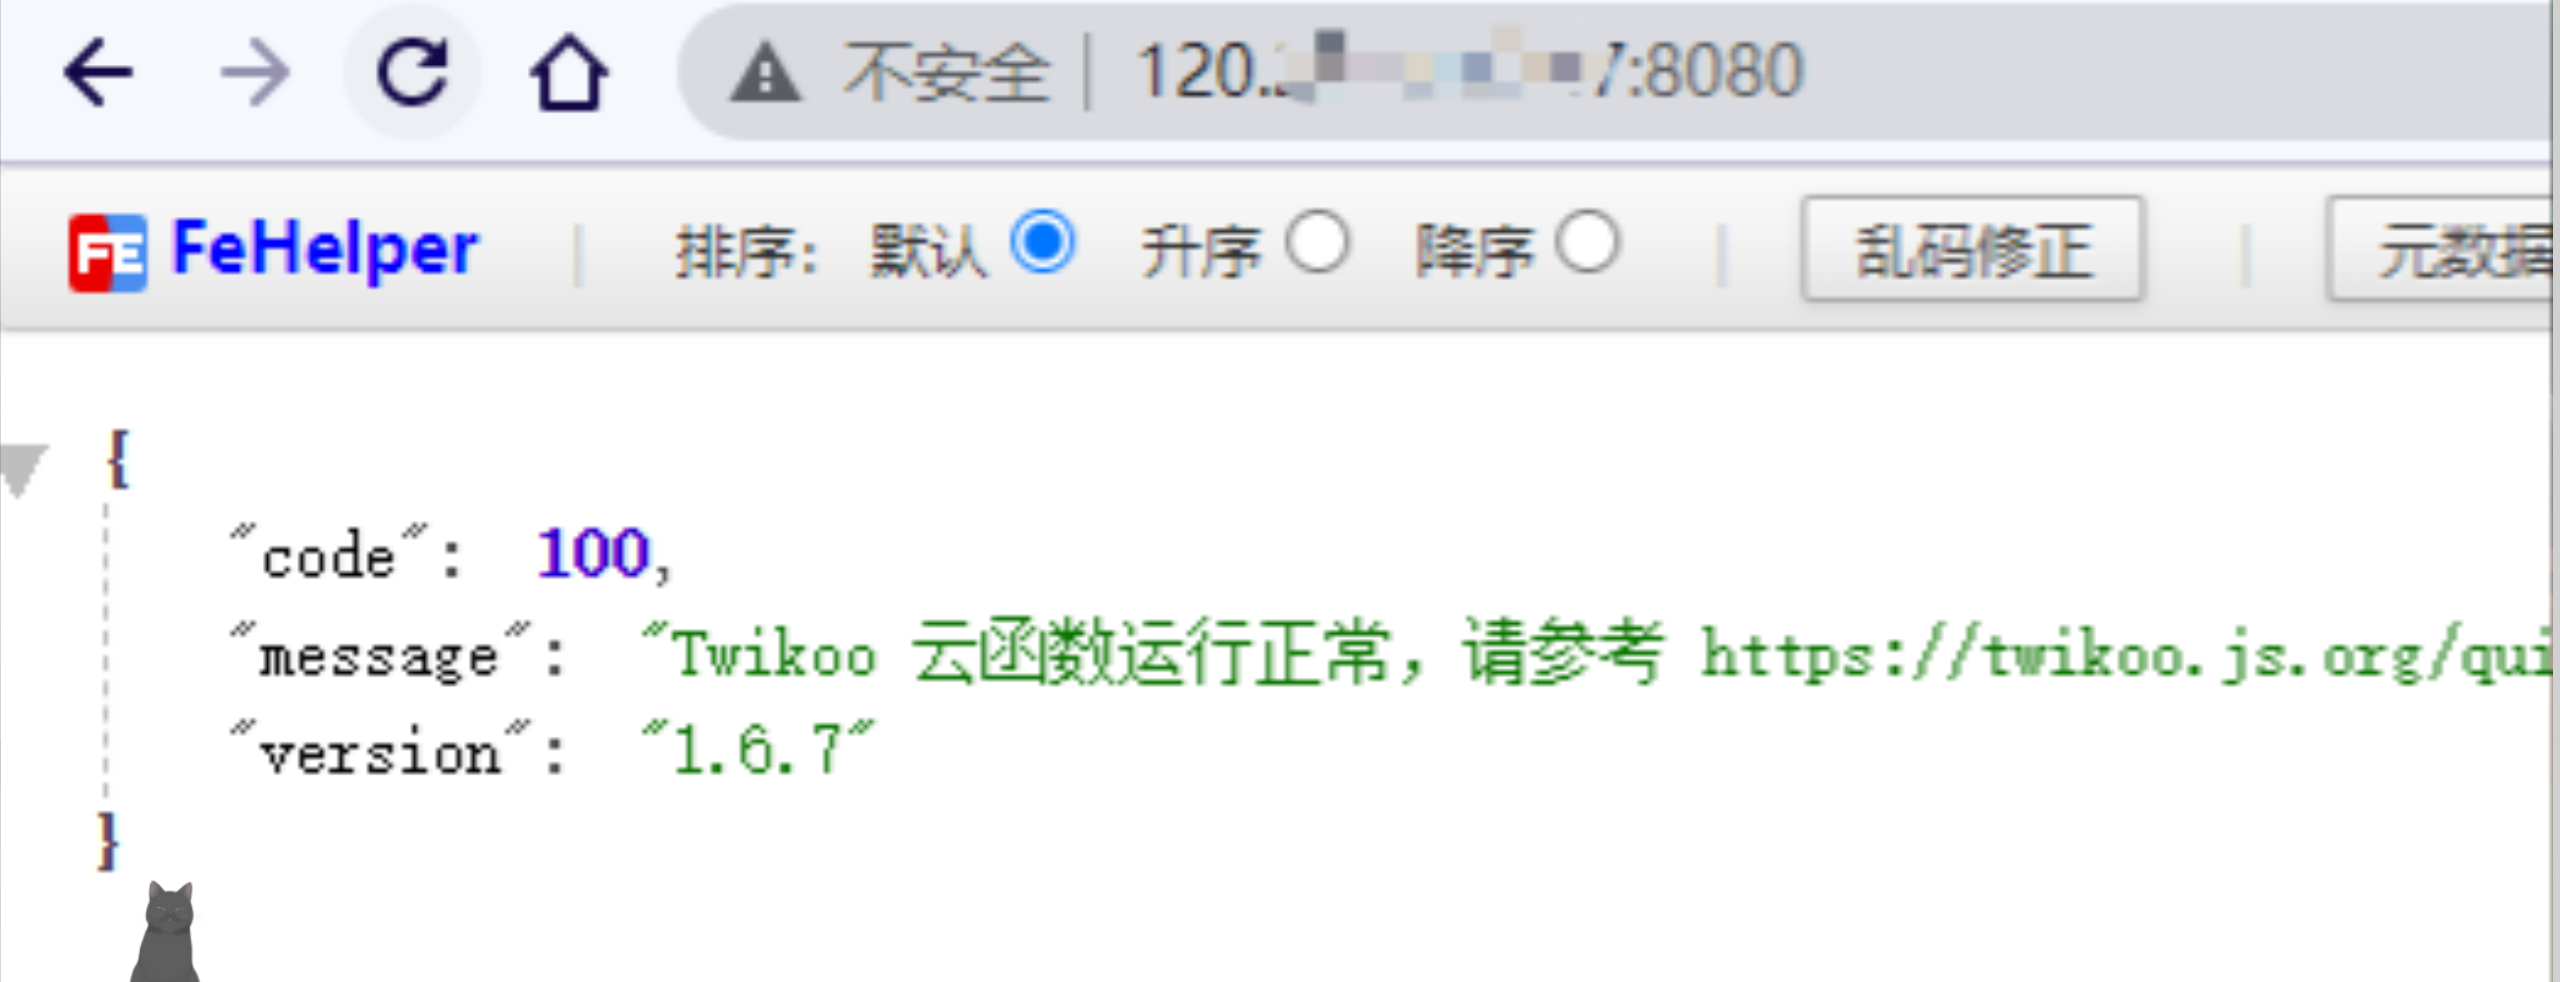
- 验证
这样,访问 https://twikoo.peterjxl.com/,就会转发到我的服务器 IP:8080 ,完成反向代理:
3、前端配置 Twikoo
这里主要参考:本站 - 评论模块 | Young Kbt blog (opens new window),感谢大佬。
01地方配置
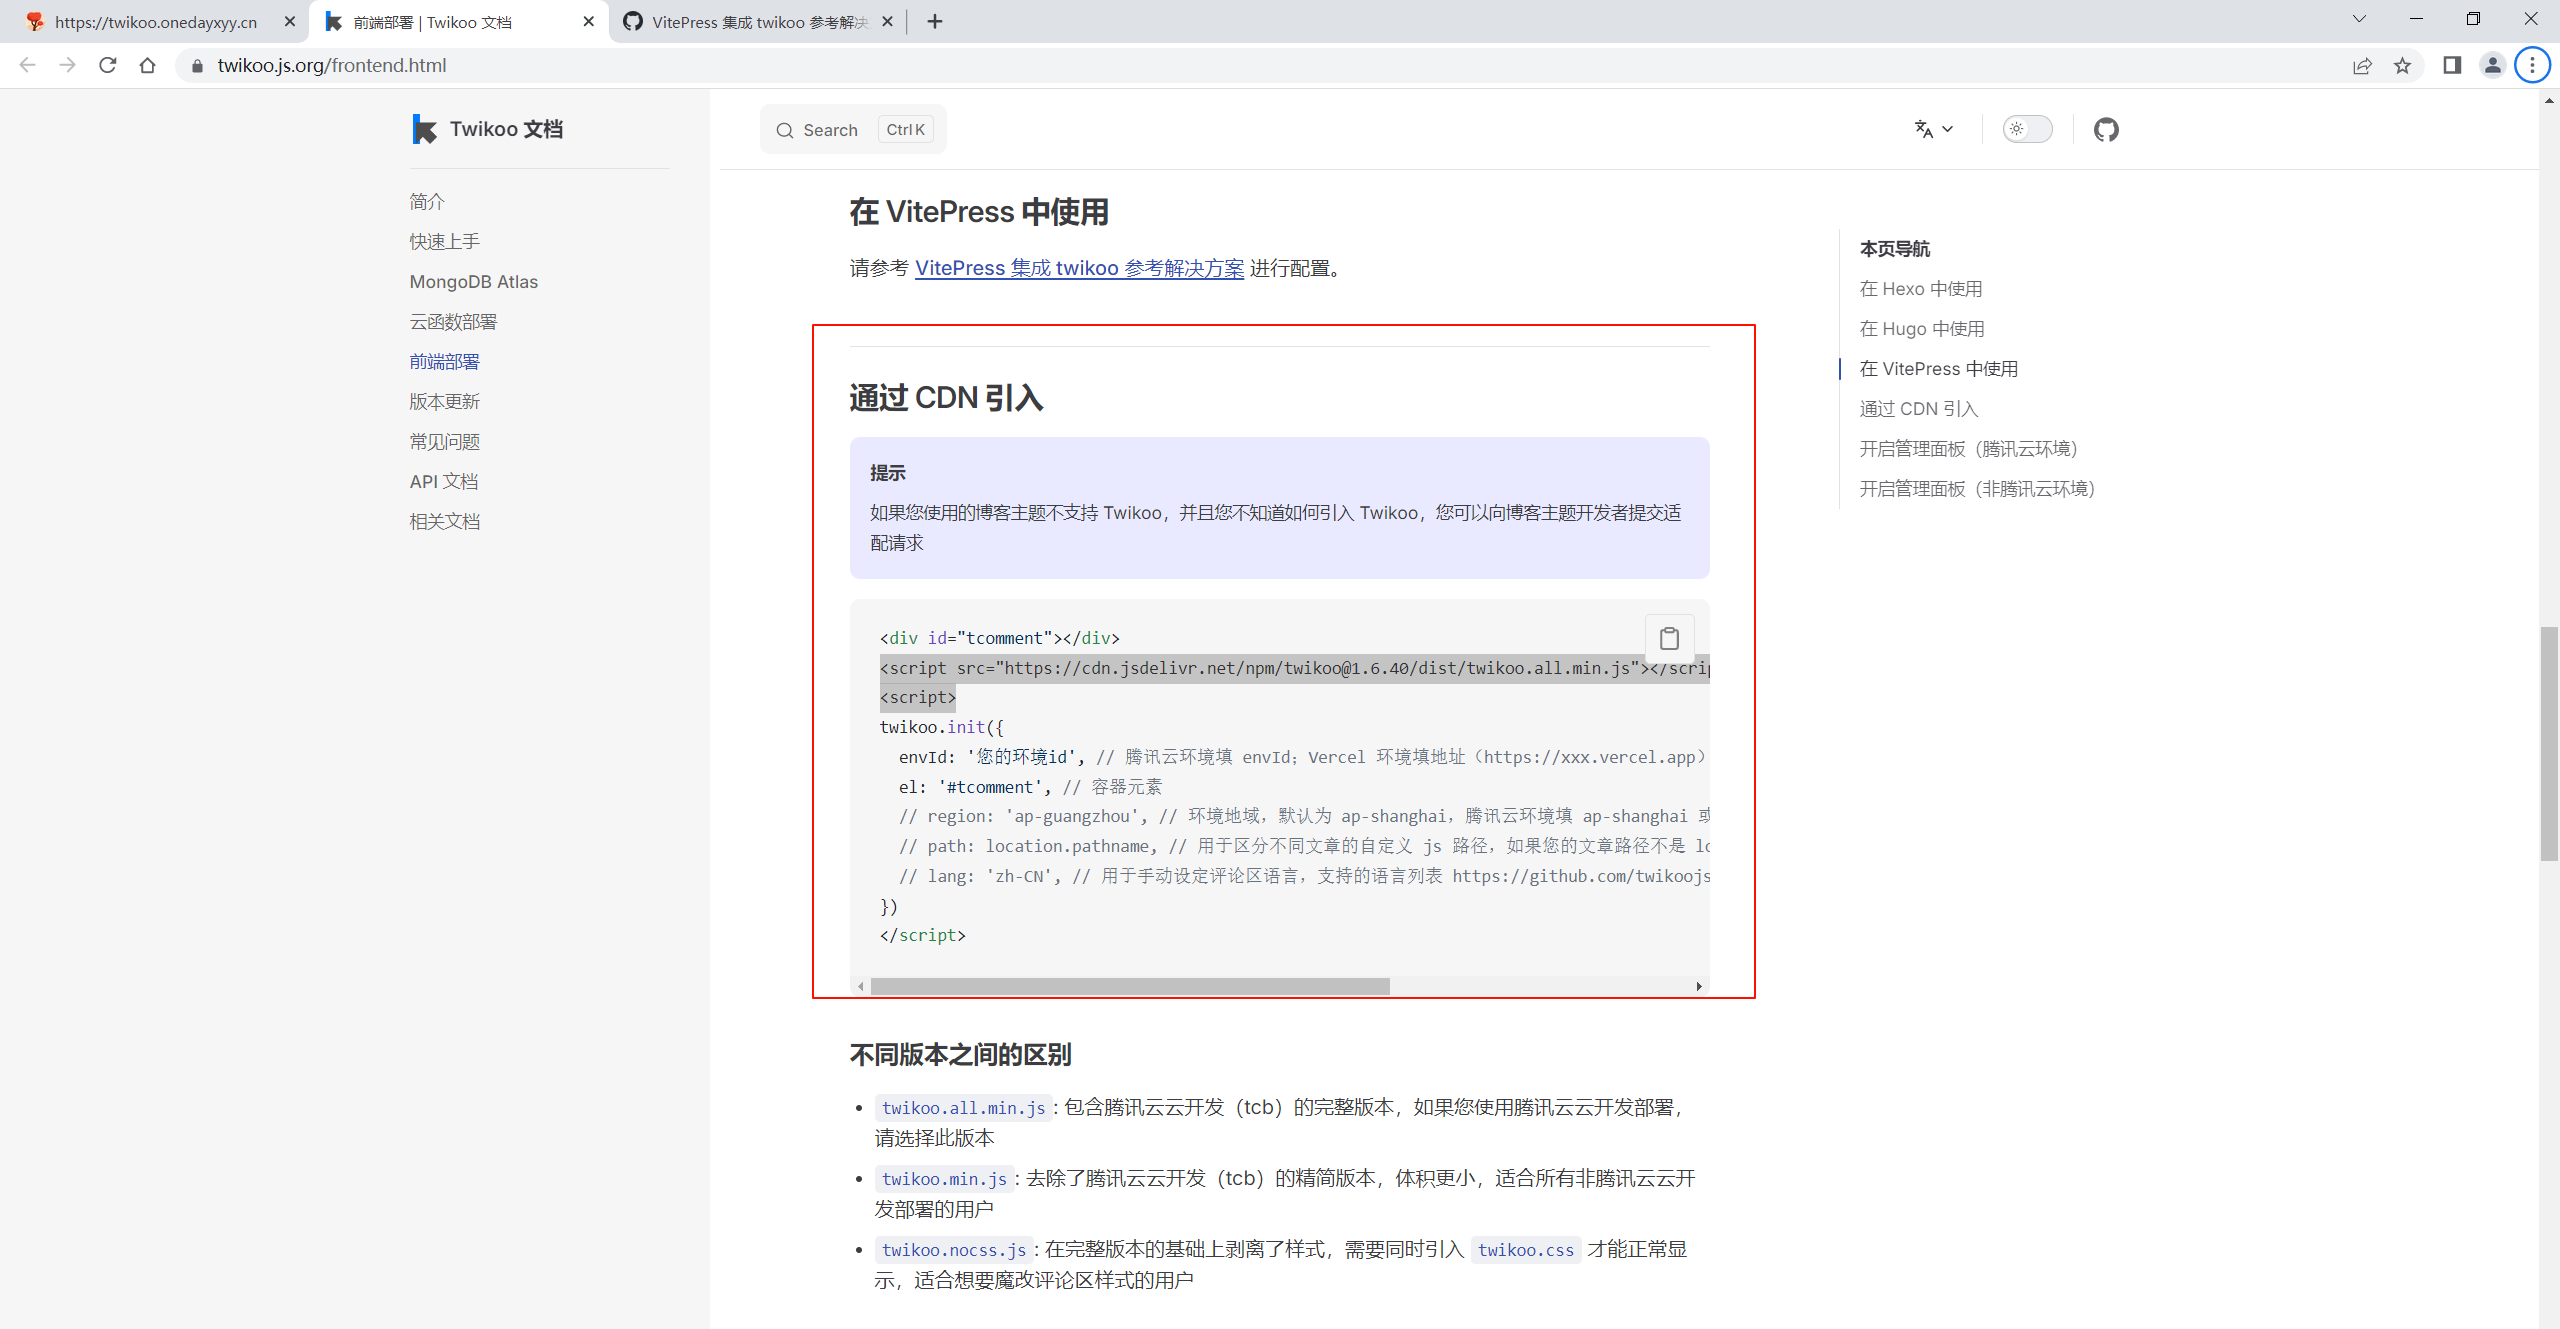
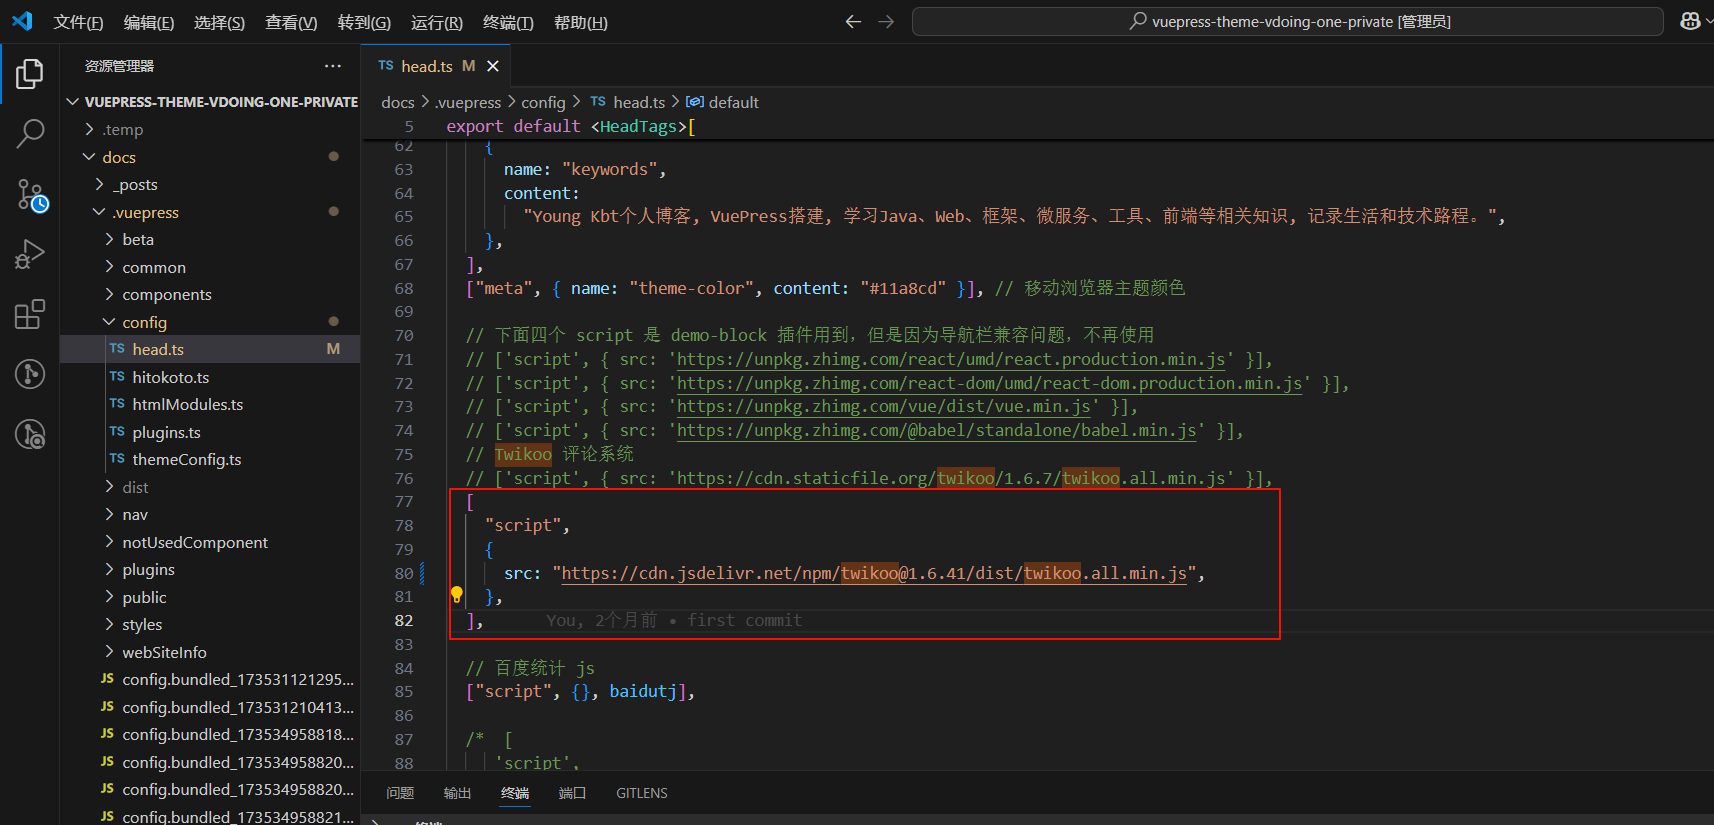
打开 docs/.vuepress/config.js,在 head 里添加如下内容(在 <head> 引入在线 script):1.6.7 是版本号。
['script', { src: 'https://cdn.staticfile.org/twikoo/1.6.7/twikoo.all.min.js' }],


我的配置:
#本次实际配置
['script', { src: 'https://cdn.jsdelivr.net/npm/twikoo@1.6.41/dist/twikoo.all.min.js' }],

    <script src="https://cdn.jsdelivr.net/npm/twikoo@1.6.41/dist/twikoo.all.min.js"></script>
<script>https://twikoo.js.org/frontend.html
02地方配置
在 docs/.vuepress/components 目录下创建 Vue 组件:Twikoo.vue。如果不存在 components 目录,则请创建。添加如下内容:注意修改 envId 为你自己的
ps:envId 就是你自己的 Twikoo 地址,例如我的是 https://twikoo.peterjxl.com/
详细信息
<template>
  <div id="tcomment"></div>
</template>
<script>
let waitTime = 700; // 页面加载后多少毫秒后加载评论区(如果是 0ms,可能会报错)
let archives = "/archives/"; // 归档页的 permalink
export default {
  data() {
    return {
      twikoo: "",
      firstLoad: true,
    };
  },
  mounted() {
    // 不初始化评论区的页面:frontmatter 的 comment: false 的文章页、首页、归档页、404 页面
    if (
      (this.$frontmatter.comment == undefined || this.$frontmatter.comment) &&
      this.$route.path != "/" &&
      this.$route.path != archives &&
      !this.isFourZeroFour(this.$route)
    ) {
      setTimeout(() => {
        this.twikooInit();
      }, waitTime);
    }
  },
  watch: {
    $route(to, from) {
      // 404 页面、不同的标题会触发路由,禁止掉
      if (
        this.$route.path == "/" ||
        this.$route.hash != "" ||
        this.isFourZeroFour(to)
      ) {
        return;
      }
      // 进入首页、进入 frontmatter 的 comment: false 页面,删除评论区
      if (to.path == "/" || this.getCommentByFrontmatter(to) == false) {
        this.deleteComment();
        return;
      }
      // 初始化评论条件:来自首页,来自归档页、来自 frontmatter 的 comment: true 的文章页
      if (
        from.path == "/" ||
        from.path == archives ||
        !this.getCommentByFrontmatter(from)
      ) {
        this.firstLoad
          ? setTimeout(() => {
              this.twikooInit();
              this.firstLoad = false;
            }, waitTime)
          : this.twikooInit(); // 如果加载过一次评论区,则直接获取
      } else if (this.$route.path != "/" && this.$route.hash == "") {
        // 文章页之间跳转,重新获取评论
        setTimeout(() => {
          this.updateComment();
        }, waitTime);
      }
    },
  },
  methods: {
    twikooInit() {
      twikoo
        .init({
          // envId 要切换成自己的,这是评论区的 ID,一个博客只能有一个评论区 ID,用别人的评论区 ID,导致读者评论时或发送到别人的评论区里
          envId: "https://twikoo.onedayxyy.cn/",
          el: "#tcomment",
          // region: 'ap-guangzhou', // 环境地域,默认为 ap-shanghai,如果您的环境地域不是上海,需传此参数
          // path: 'window.location.pathname', // 用于区分不同文章的自定义 js 路径,如果您的文章路径不是 location.pathname,需传此参数
          // lang: 'zh-CN', // 用于手动设定评论区语言,支持的语言列表 https://github.com/imaegoo/twikoo/blob/dev/src/js/utils/i18n/index.js
          // onCommentLoaded: function () {
          // console.log("评论加载或评论成功");
          // },
        })
        .then(() => {
          this.loadTwikoo();
        });
    },
    // 初始化加载或者跳转新页面重新加载 Twikoo 评论区
    loadTwikoo() {
      let page = document.getElementsByClassName("page")[0];
      let comment = document.getElementById("twikoo");
      // comment 不存在代表曾初始化过,后面被删除
      comment ? (this.twikoo = comment) : (comment = this.twikoo);
      page
        ? comment
          ? page.appendChild(comment)
          : page.appendChild(this.twikoo)
        : "";
      this.updateComment();
    },
    // 跳转新页面,重新获取当前页面的评论信息
    updateComment() {
      let tk_icon = document.getElementsByClassName("tk-icon")[0];
      tk_icon ? tk_icon.click() : undefined;
    },
    // 删除 frontmatter:comment: false 页面的数据
    deleteComment() {
      let comment = document.getElementById("twikoo");
      comment ? comment.parentNode.removeChild(comment) : "";
    },
    // 获取 frontmatter 的 comment
    getCommentByFrontmatter(route) {
      let comment = true;
      this.$site.pages.forEach((item) => {
        if (item.path == route.path) {
          comment = item.frontmatter.comment;
        }
      });
      return comment;
    },
    // 判定当前页面是不是 404
    isFourZeroFour(route) {
      let flag = true;
      this.$site.pages.forEach((item) => {
        if (item.path == route.path) {
          flag = false;
        }
      });
      return flag;
    },
  },
};
</script>

<style>
.twikoo .tk-comments {
  margin-top: 20px;
}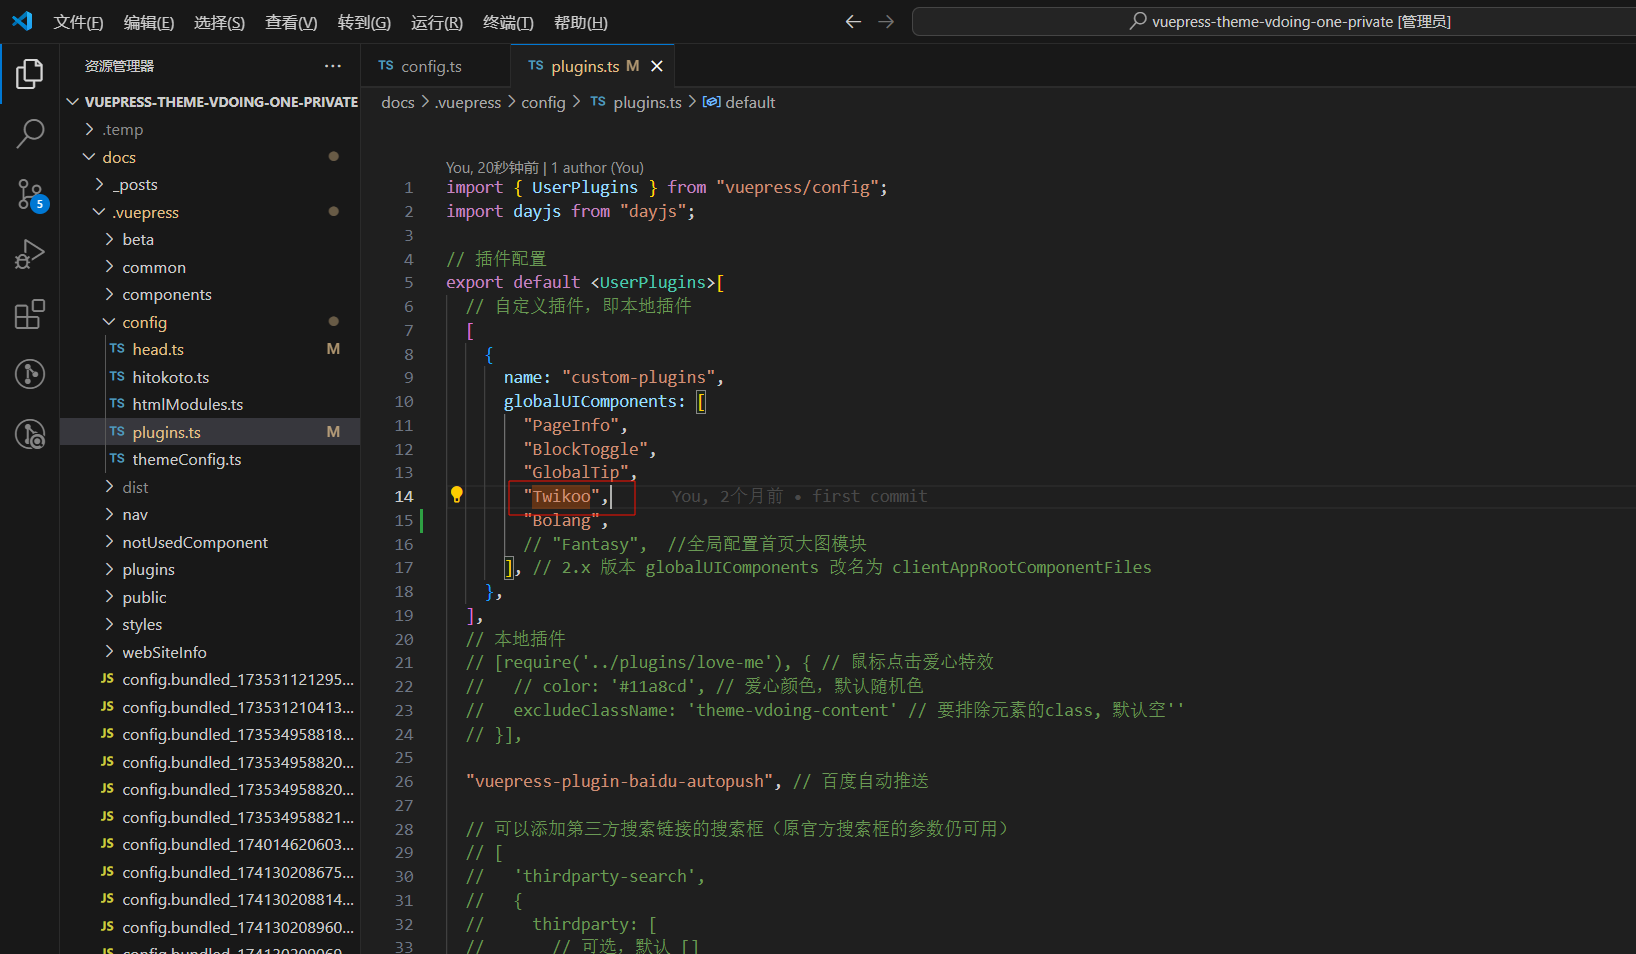
</style>03地方配置
参考这里:
https://notes.youngkbt.cn/about/website/comment/#vdoing-集成
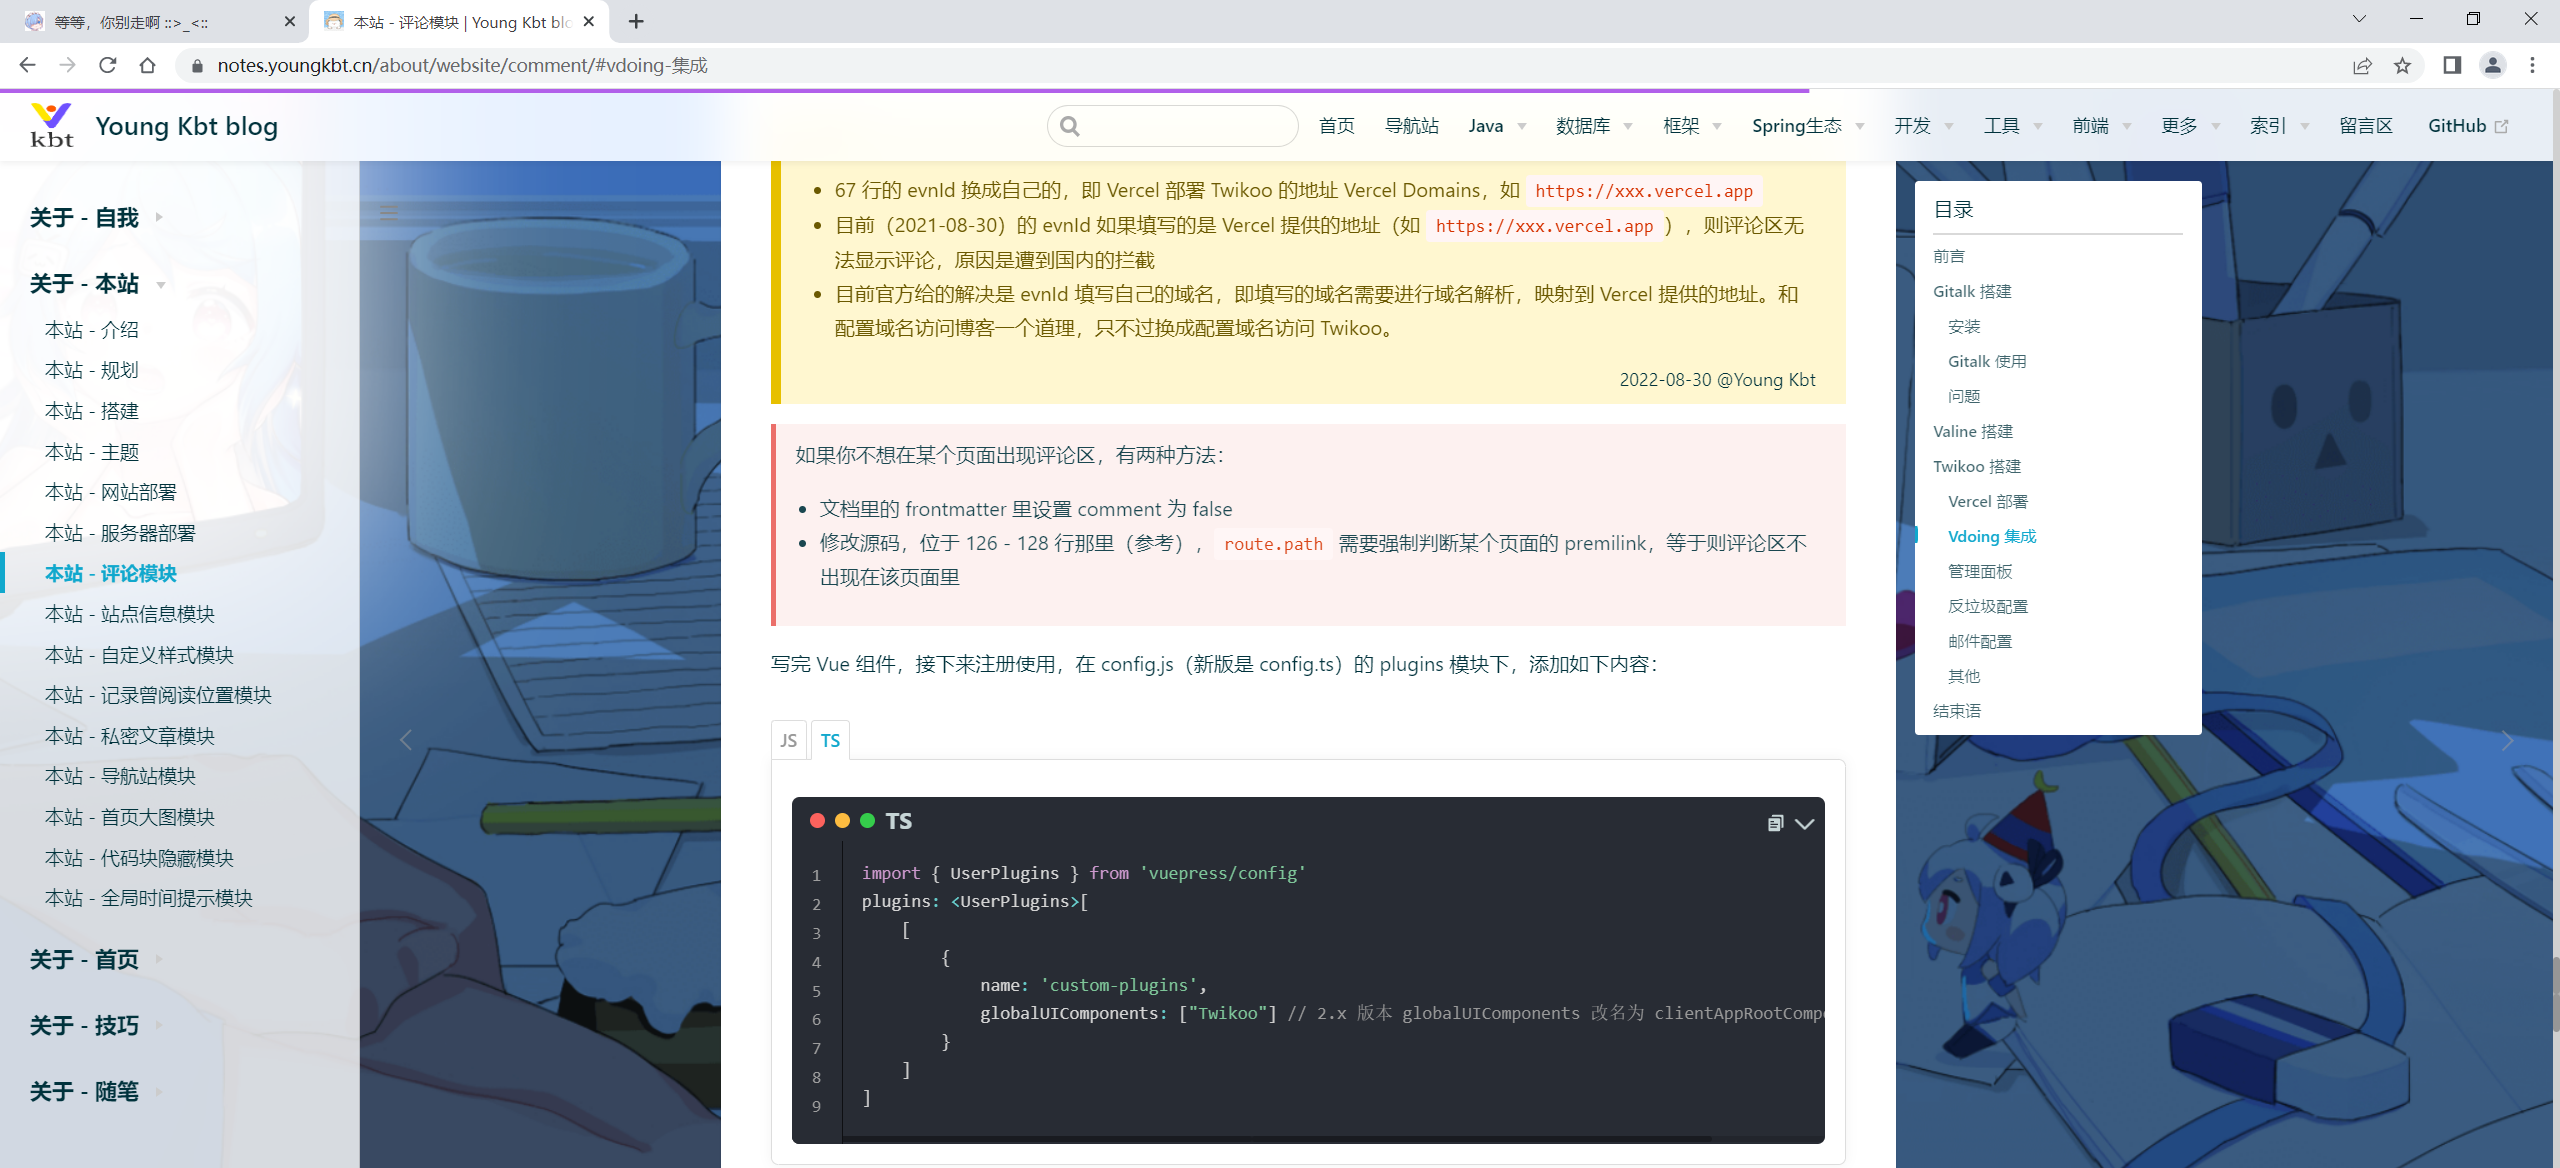
import { UserPlugins } from 'vuepress/config'
plugins: <UserPlugins>[
    [
    	{
        	name: 'custom-plugins',
        	globalUIComponents: ["Twikoo"] // 2.x 版本 globalUIComponents 改名为 clientAppRootComponentFiles
    	}
    ]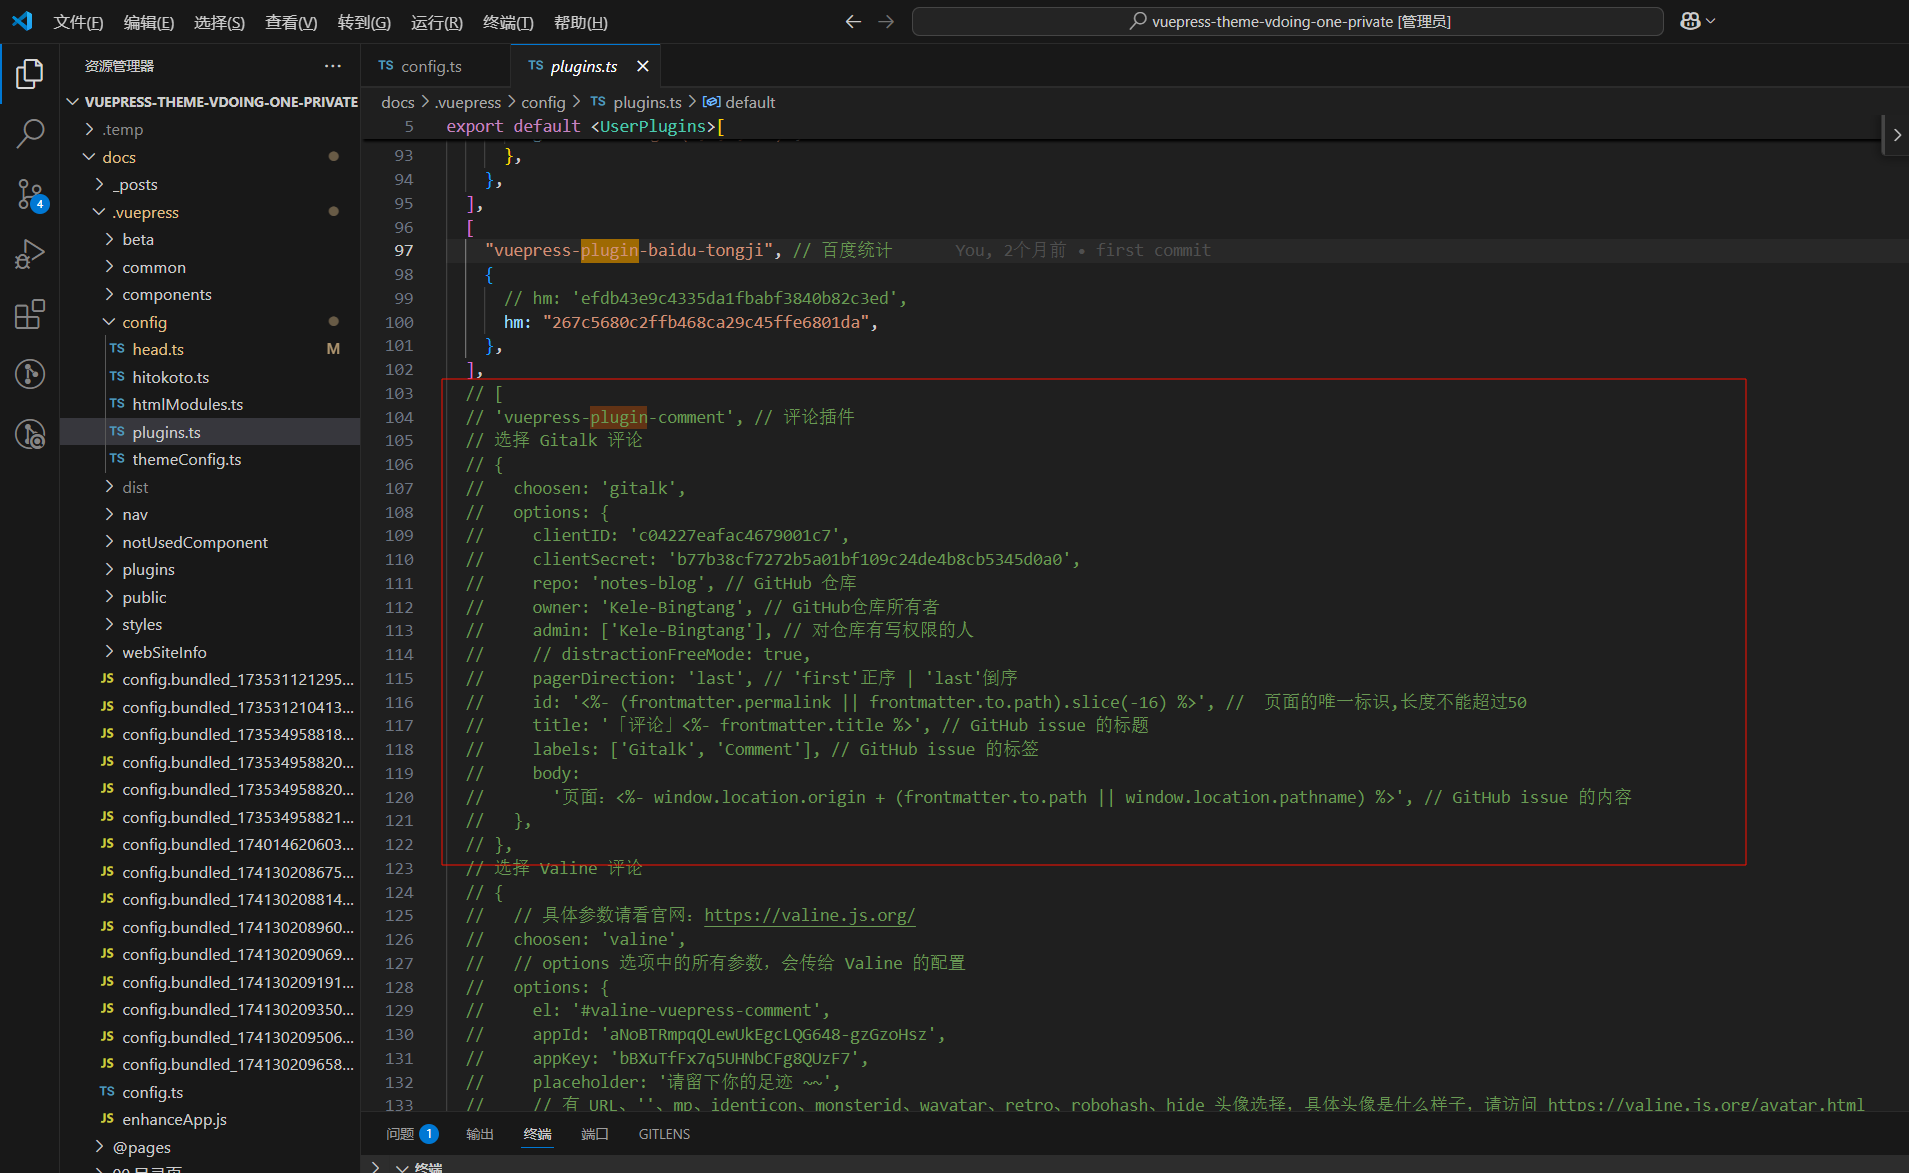
]- 自己实际配置:
04注释原来评论插件
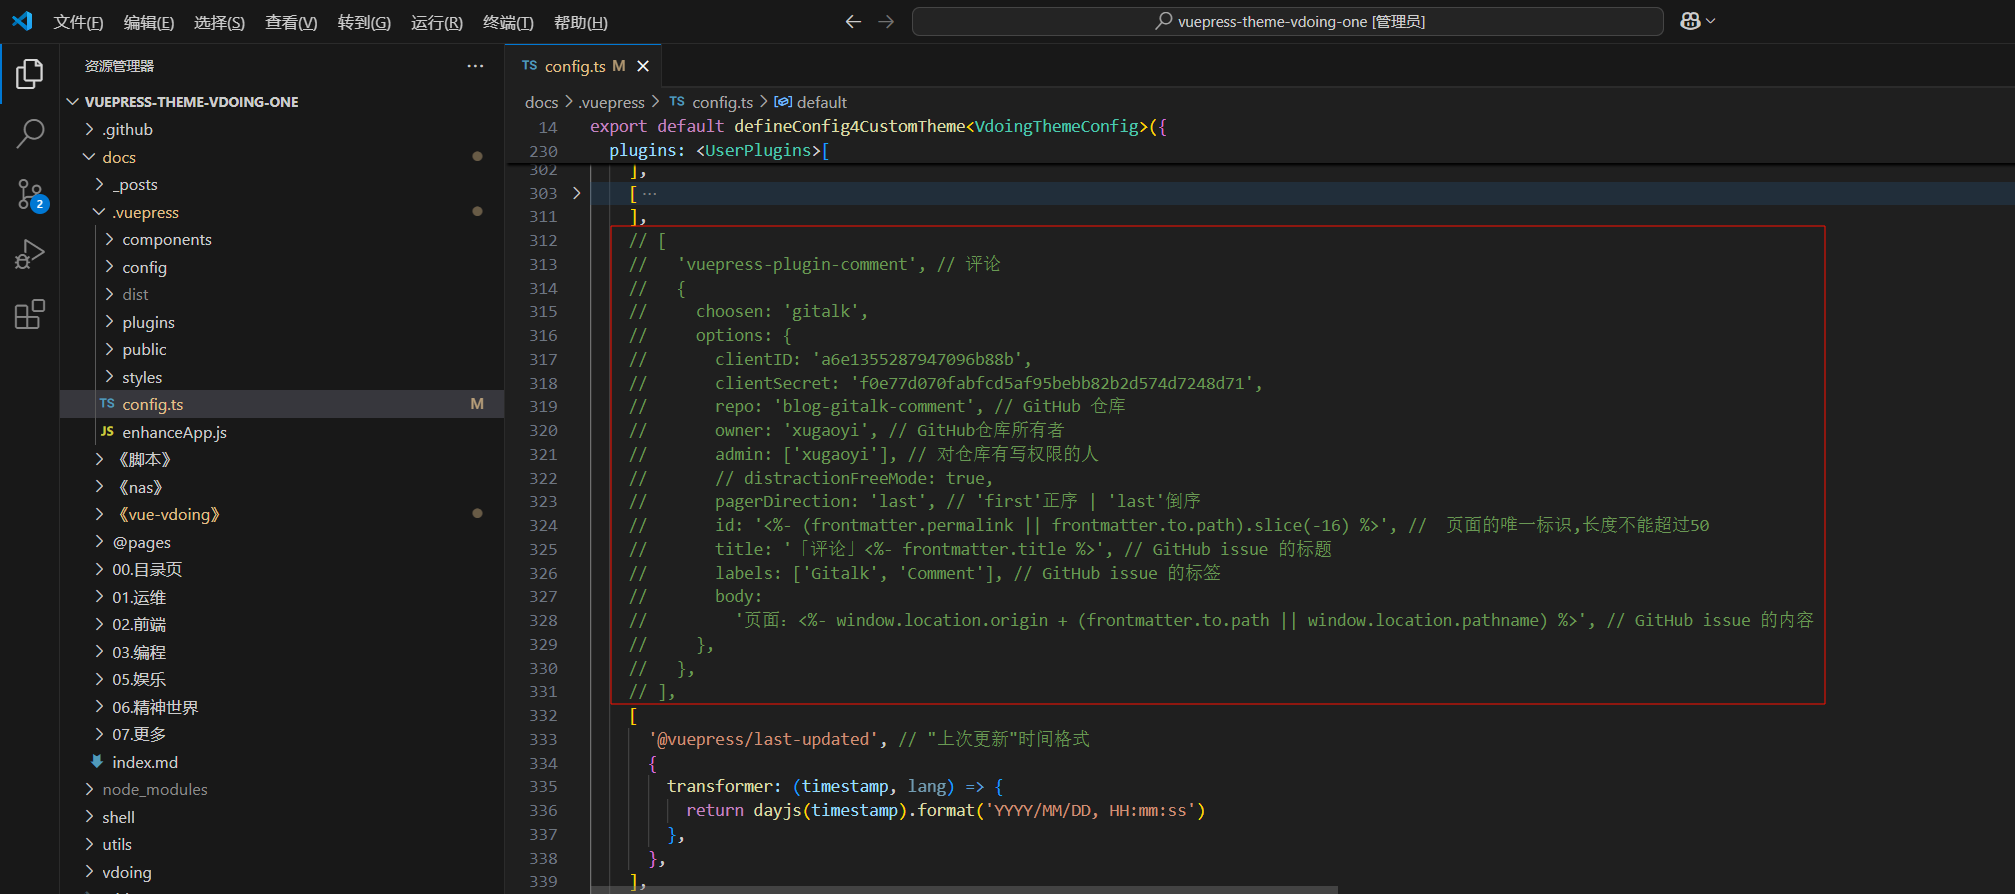
- 自己版本配置
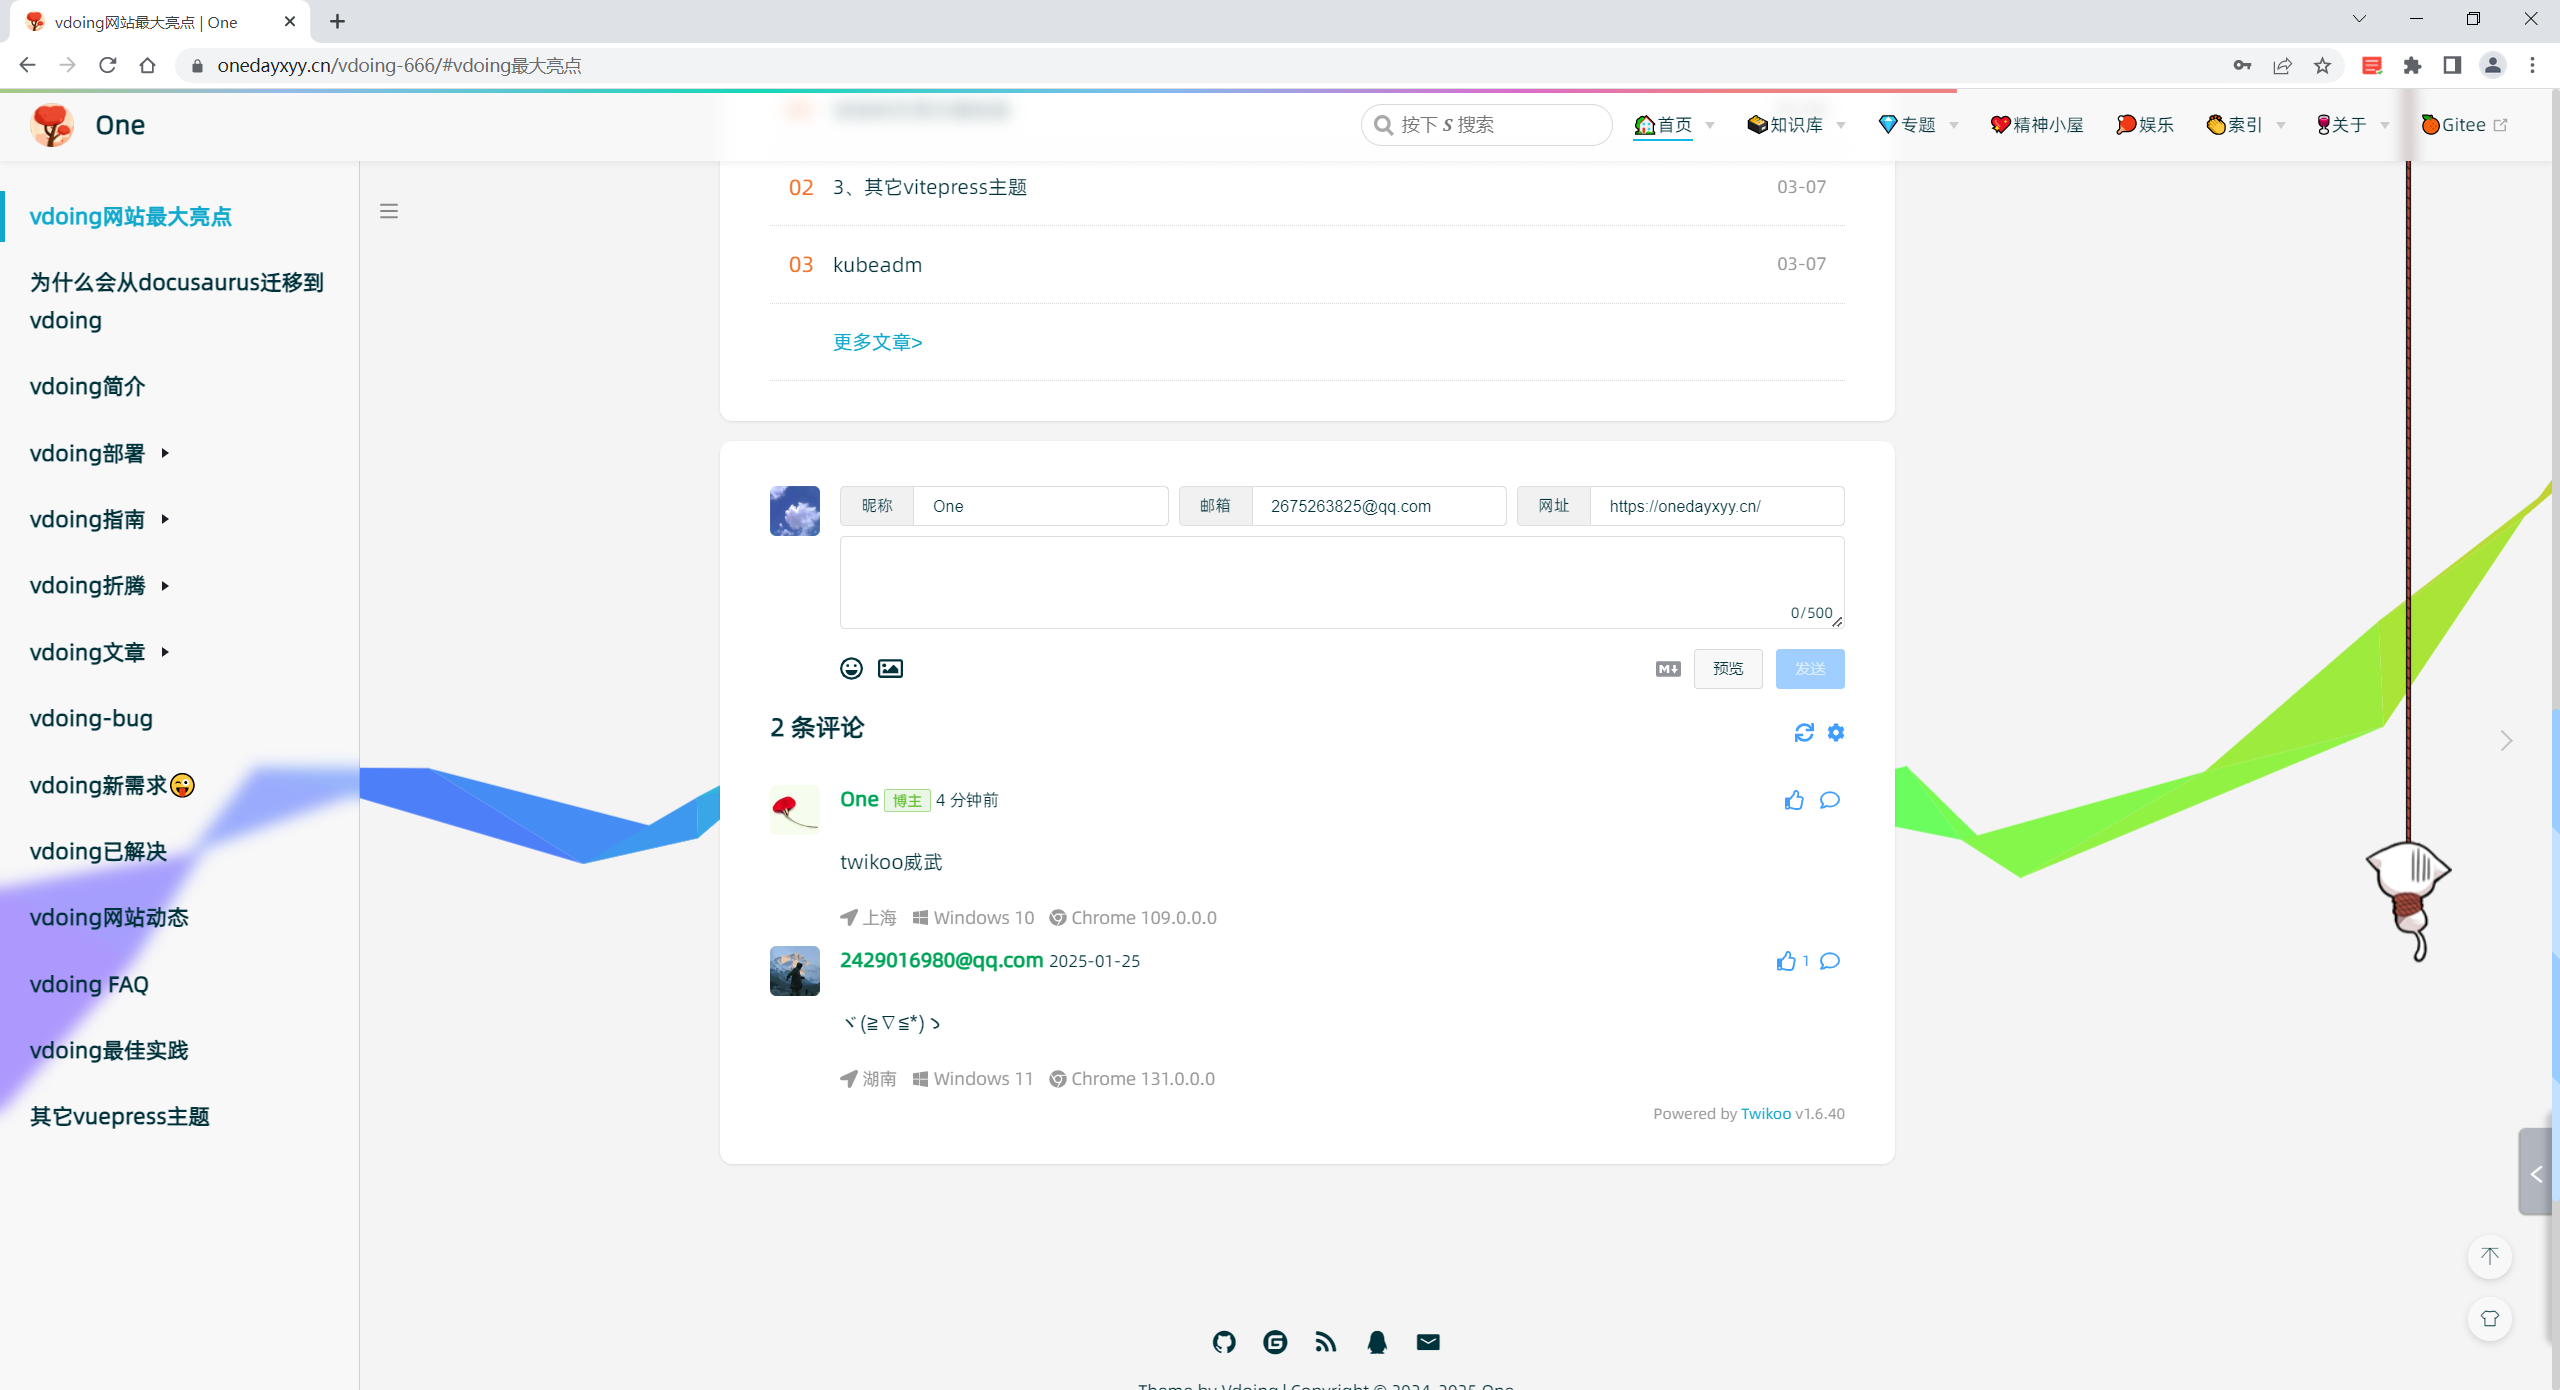
4、效果
完美。🤣
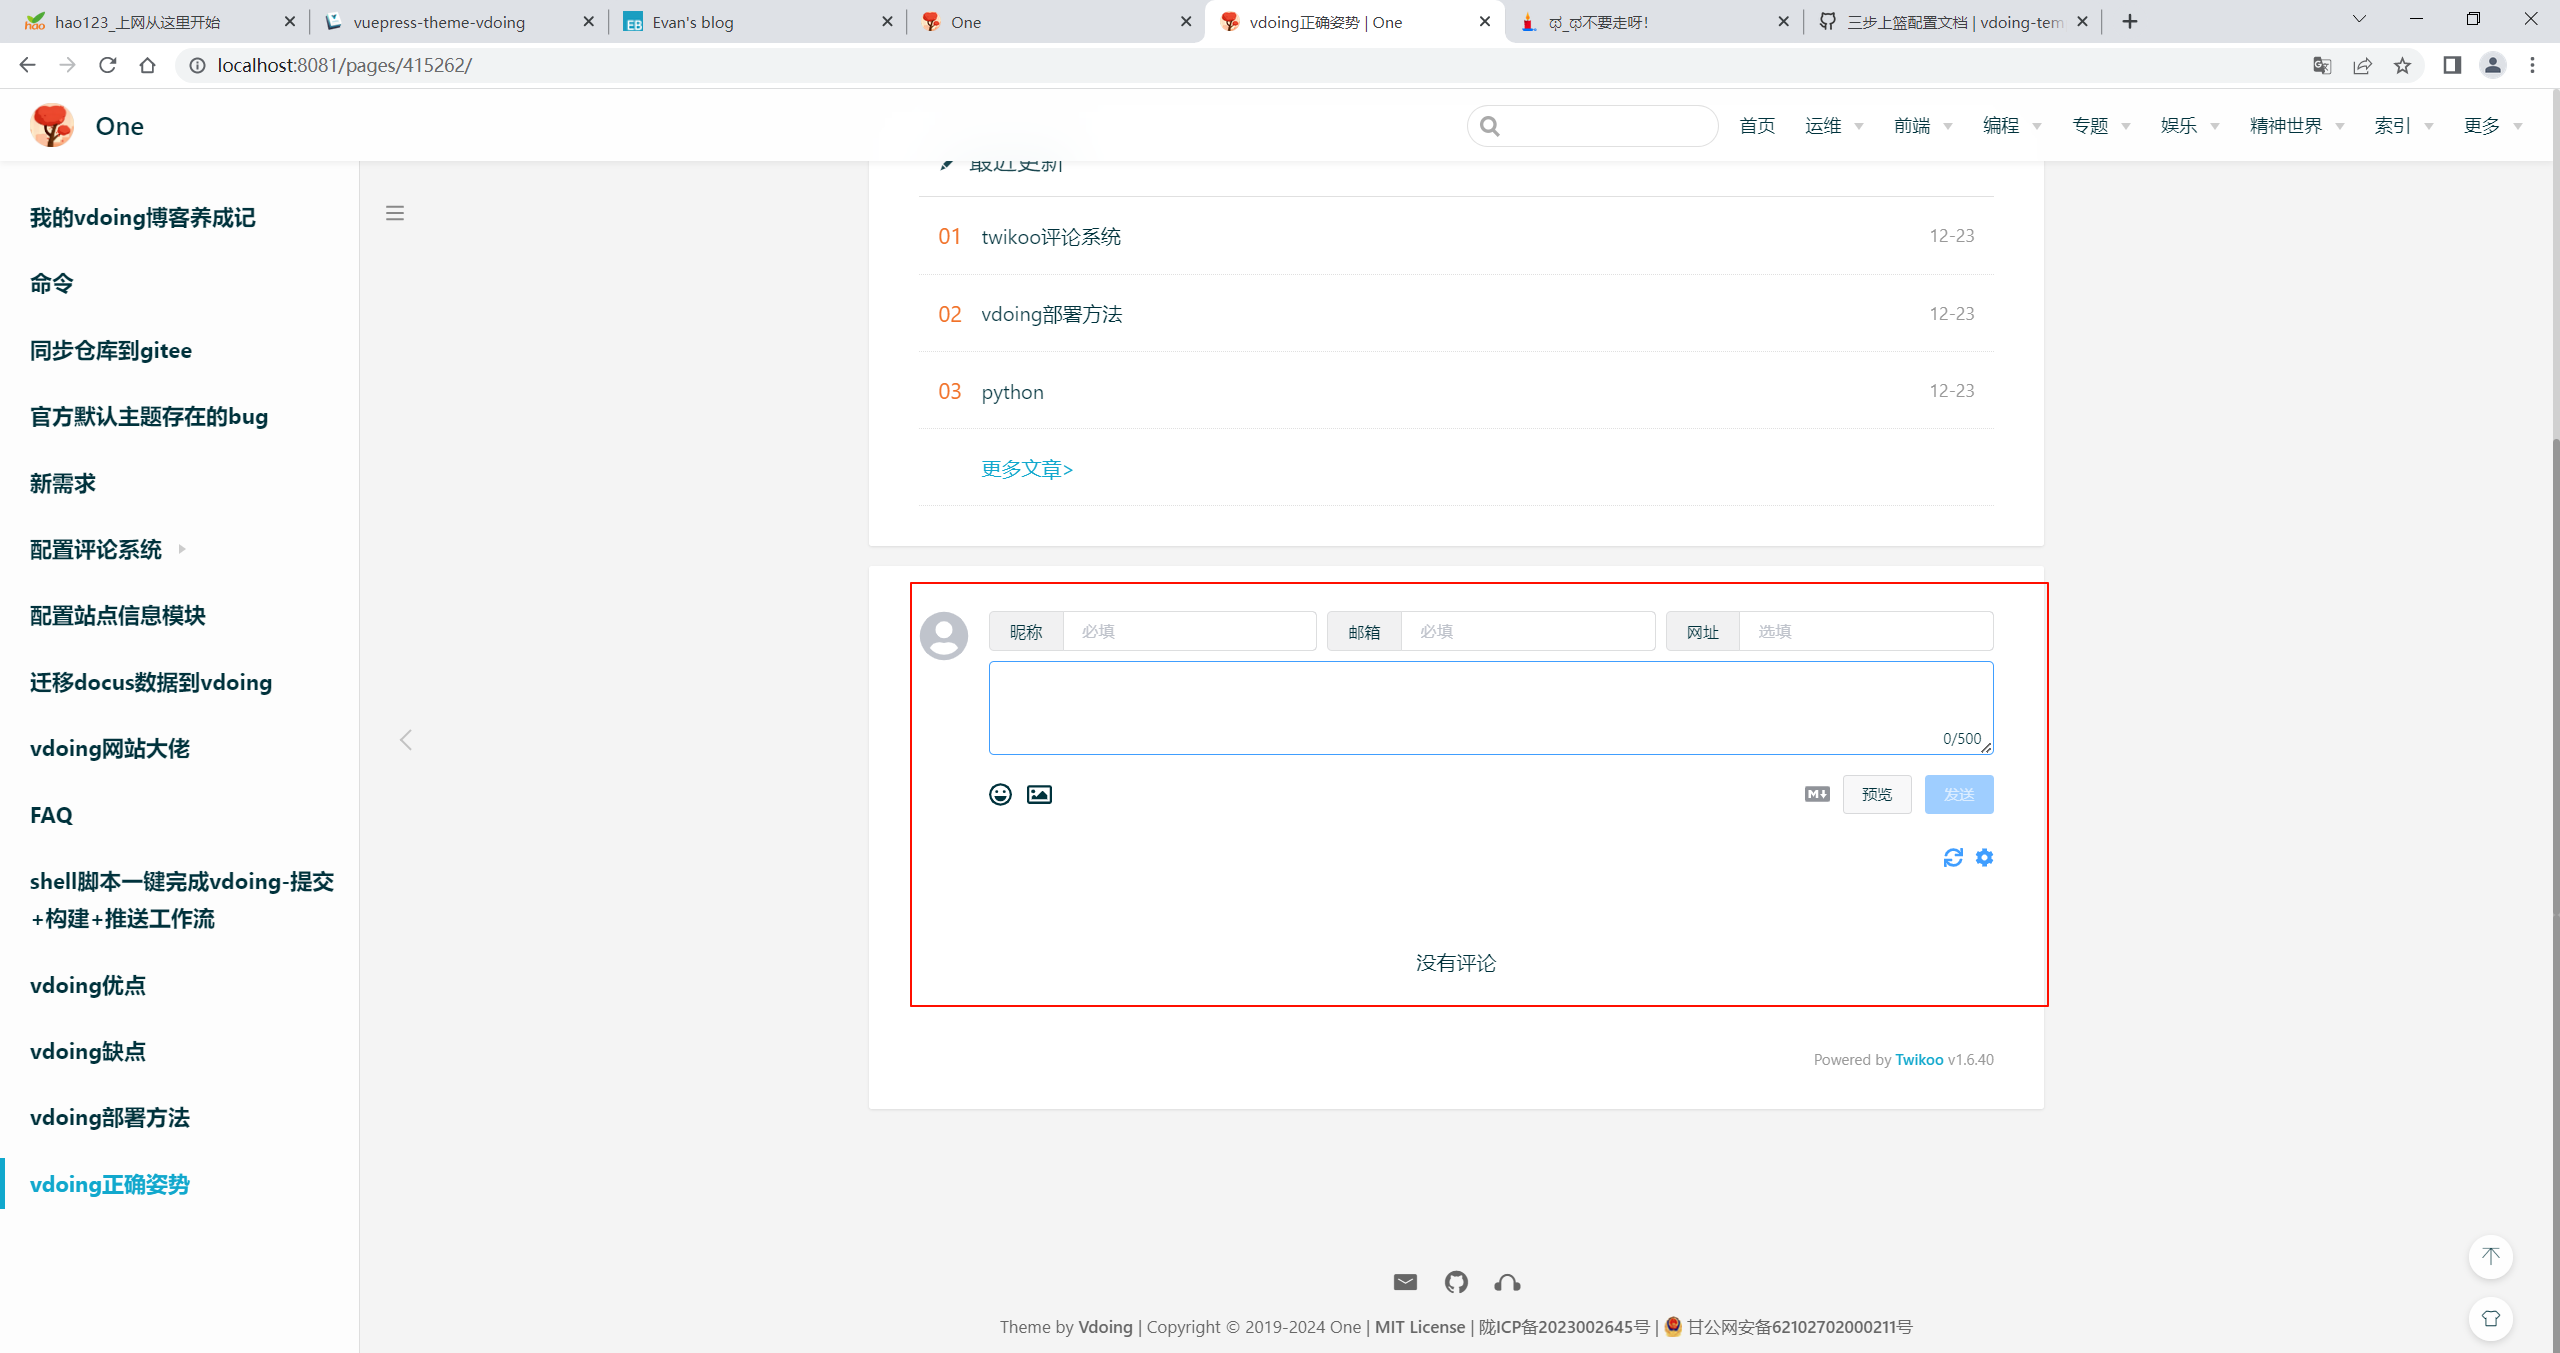

配置完之后,就注册下,要记住密码。
后续步骤进很简单了。😜
FAQ
Twikoo 支持多种部署方式:云函数,Vercel,私有部署、Docker.... 具体参见文档:https://twikoo.js.org/backend.html
最原始的方法,也就是直接在服务器上部署,步骤很简单:安装 node → 安装 tkserver → 启动。
$ npm i -g tkserver

$ ln -s /opt/nodejs/node/bin/tkserver /usr/local/bin/tkserver

$ tkserver然后就可以访问了,地址是:http://服务端IP:8080
Linux 服务器可以用 nohup tkserver >> tkserver.log 2>&1 & 命令后台启动。
注意:可能需要在云服务器上开启 8080 端口的防火墙
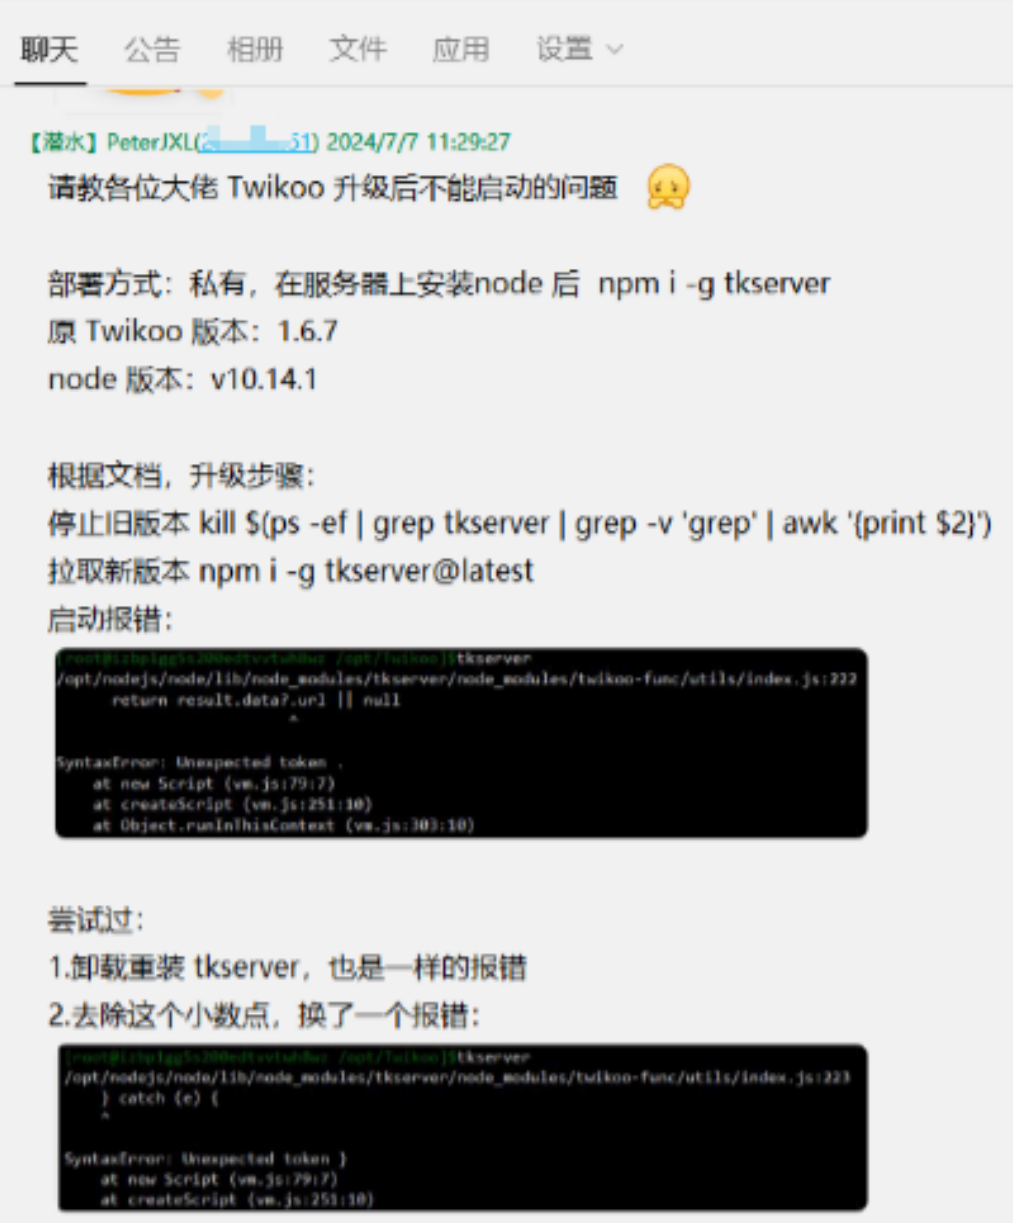
还是推荐用 Docker 来部署。我之前是用私有部署,几年后想升级 Twikoo,但是因为 node 版本太老了,导致升级失败... 然后试着升级 node,又是一堆报错...
关于我
我的博客主旨:
- 排版美观,语言精炼;
- 文档即手册,步骤明细,拒绝埋坑,提供源码;
- 本人实战文档都是亲测成功的,各位小伙伴在实际操作过程中如有什么疑问,可随时联系本人帮您解决问题,让我们一起进步!
🍀 个人网站

🍀 微信二维码
x2675263825 (舍得), qq:2675263825。

🍀 微信公众号
《云原生架构师实战》

🍀 csdn
https://blog.csdn.net/weixin_39246554?spm=1010.2135.3001.5421
🍀 知乎
https://www.zhihu.com/people/foryouone
最后
如果你还有疑惑,可以去我的网站查看更多内容或者联系我帮忙查看。
如果你有更好的方式,评论区留言告诉我。谢谢!
好了,本次就到这里了,感谢大家阅读,最后祝大家生活快乐,每天都过的有意义哦,我们下期见!