
实战-创建docker私有化仓库(已成功测试-已博客输出-mk老师)20210529
实战:创建docker私有化仓库(已成功测试-已博客输出-mk老师)20210529
鸣谢
这里,非常感谢IT学神MK老师分享的优良且细致的公开课,本篇文章是从老师公开课及文档整理而来的,欢迎小伙伴查阅。
前言
(1)私有仓库介绍
有时候使用 Docker Hub 这样的公共仓库可能不方便(有时候无法访问),用户可以创建一个本地仓
库供私人使用,这里使用官方提供的工具 docker-registry 来配置私有库。
1、使用官方提供的工具来配置
docker-registry 是官方提供的工具,可以用于构建私有的镜像仓库。
registry [ˈredʒɪstri] 记录,登记
私有仓库好处:
1、节约带宽
2、可以自己定制系统
搭建私有仓库的思路:
老的思路:下载源码 tar/yum 安装 -》 安装-》修改配置文件-》启动服务;
使用 docker 思路:直接下载并使用 registry 镜像启动docker 实例,这样仓库就搭建成功了。
有了 docker 以后,所有软件不再以 office.exe 戒 lrzsz.rpm 形式发布,而以 docker 镜像发布。你
只需要下载 docker 镜像并运行一个 docker 实例。有了 docker 以后,再也不用为安装 linux 服务而发
愁。
(2)registry镜像
使用 registry 镜像搭建一个私有仓库。 registry 镜像中已经把搭建私有库程序安装好了,我只需要
使用 registry 镜像运行一个 docker 实例就可以了。
(3)busybox镜像
BusyBox 概述: BusyBox 是一个集成了一百多个最常用 Linux 命令和工具的软件。BusyBox 包
含了 BusyBox 包含了一些简单的工具,例如 ls、cat 和 echo 等等,还包含了一些更大、更复杂的工具,例 grep、find、mount 以及 telnet。有些人将 BusyBox 称为 Linux 工具里的瑞士军刀。简单的说
BusyBox 就好像是个大工具箱,它集成压缩了 Linux 的许多工具和命令,也包含了 Android 系统的自
带的 shell。

官网: www.busybox.net
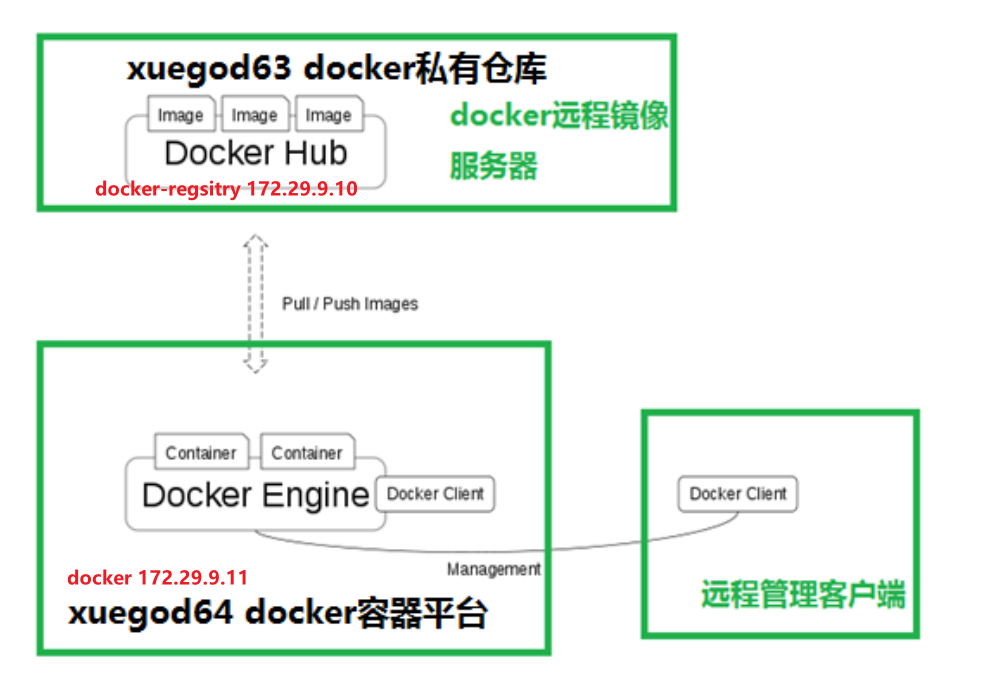
实验环境
2台centos7.x虚机:
| 主机名 | ip | 系统版本 | 备注 |
|---|---|---|---|
| docker-registry | 172.29.9.10 | centos7.7 1908 | docker 私有仓库地址 |
| docker | 172.29.9.11 | centos7.7 1908 | docker 服务器地址 |
备注:
docker 172.29.9.11 会使用 docker-registry 上 docker 私有仓库来pull/push 镜像。实验拓扑图
实验软件
busybox.tar registry.tar

0、基础环境配置
准备2台已经做好基础配置且安装好docker的的机器:我这边是直接从快照还原/克隆过来的。
1、基础环境配置脚本
(1)关闭且禁用如下服务:firewalld、NetworkManager、selinux
systemctl stop firewalld && systemctl disable  firewalld && systemctl stop NetworkManager && systemctl disable  NetworkManager
setenforce 0
sed -i s/SELINUX=enforcing/SELINUX=disabled/ /etc/selinux/config

(2)配置网络yum源:
cd /etc/yum.repos.d/
mkdir backup-`date +%F`
mv * !$

wget -O /etc/yum.repos.d/CentOS-Base.repo http://mirrors.aliyun.com/repo/Centos-7.repo
yum clean all
yum makecache

yum install -y net-tools
yum install -y vim
yum install -y wget
yum install -y lrzsz

(3)配置主机名(对相应的机器配置主机名)
hostnamectl --static set-hostname docker-registory
exec bash
hostnamectl --static set-hostname docker
exec bash

(4)配置路由转发功能
echo "net.ipv4.ip_forward = 1" >> /etc/sysctl.conf
sysctl -p
cat /proc/sys/net/ipv4/ip_forward2、安装docker脚本
#安装必要的一些系统工具
yum install -y yum-utils device-mapper-persistent-data lvm2

#配置国内 docker 的 yum 源
yum-config-manager --add-repo https://mirrors.tuna.tsinghua.edu.cn/docker-ce/linux/Centos/docker-ce.repo
yum makecache

#安装 docker-ce
yum install docker-ce docker-ce-cli containerd.io -y

#启动并开机自启docker服务
systemctl start docker && systemctl enable docker

#查看docker版本
docker version
docker info

#配置docker镜像地址
mkdir -p /etc/docker
tee /etc/docker/daemon.json <<-'EOF'
{
 "registry-mirrors":["https://dockerhub.azk8s.cn","http://hub-mirror.c.163.com","http://qtid6917.mirror.aliyuncs.com"]
}
EOF
systemctl daemon-reload
systemctl restart docker

#开启网络转发功能
echo "net.ipv4.ip_forward = 1" >> /etc/sysctl.conf
sysctl -p1、配置docker-registry 为 docker 私有仓库
(1)启动docker
[root@docker-registory ~]# systemctl start docker
[root@docker-registory ~]# systemctl status docker(2)拉取 registry 镜像
#备注
registry 镜像中包括搭建本地私有仓库的软件:
registry [ˈredʒɪstri] 记录,登记 ; pull 拉 ; push 推这边有2种方法可以拉取registry 镜像:
方法一:导入本地镜像
[root@docker-registory ~]# ll -h registry.tar
-r-------- 1 root root 35M 3月  26 2017 registry.tar
[root@docker-registory ~]# docker load -i registry.tar
9f8566ee5135: Loading layer [==================================================>]  5.054MB/5.054MB
b5aac7bb5fdf: Loading layer [==================================================>]  7.798MB/7.798MB
f38182d44088: Loading layer [==================================================>]  22.79MB/22.79MB
6767cac03a2d: Loading layer [==================================================>]  3.584kB/3.584kB
0912b310db10: Loading layer [==================================================>]  2.048kB/2.048kB
Loaded image: registry:latest
[root@docker-registory ~]#方法二: 在线拉取镜像
[root@docker-registory ~]# docker pull registry(3)查看registry 镜像
[root@docker-registory ~]# docker images
REPOSITORY   TAG       IMAGE ID       CREATED       SIZE
registry     latest    1fd8e1b0bb7e   6 weeks ago   26.2MB
[root@docker-registory ~]#

#扩展:.io 域名
.io 是[british indian ocean territory] 英属印度洋领地的简写(4)使用 registry 镜像搭建一个私有仓库
使用 registry 镜像搭建一个私有仓库。 registry 镜像中已经把搭建私有库程序安装好了,我只需要
使用 registry 镜像运行一个 docker 实例就可以了。
默认情况下,Registry 程序的存放镜像信息的目录是**/var/lib/registry 目录下,这样如果容器被初删除,则存放于容器中的镜像也会丢失,所以我们一般情况下会指定本地物理机一个目录如/opt/registry挂载到容器的/var/lib/registry 下**。使用-v 参数,指定本地持久的路径。
registry 服务监听的端口号,默认是 5000;
[root@docker-registory ~]# docker run  -d -p 5000:5000 -v /opt/registry:/var/lib/registry registry:latest
faec5b5a9d99a7ac53360033411f17d8fa95af81c750fda9e70162cb56513a02


[root@docker-registory ~]# ls /opt/registry/ #这个目录会自动创建的。
[root@docker-registory ~]# docker ps
CONTAINER ID   IMAGE             COMMAND                  CREATED          STATUS          PORTS                                       NAMES
faec5b5a9d99   registry:latest   "/entrypoint.sh /etc…"   17 seconds ago   Up 16 seconds   0.0.0.0:5000->5000/tcp, :::5000->5000/tcp   flamboyant_johnson


[root@docker-registory ~]# netstat -antup|grep 5000 #说明,私有库已经启动成功。
tcp        0      0 0.0.0.0:5000            0.0.0.0:*               LISTEN      79624/docker-proxy
tcp6       0      0 :::5000                 :::*                    LISTEN      79630/docker-proxy
[root@docker-registory ~]#
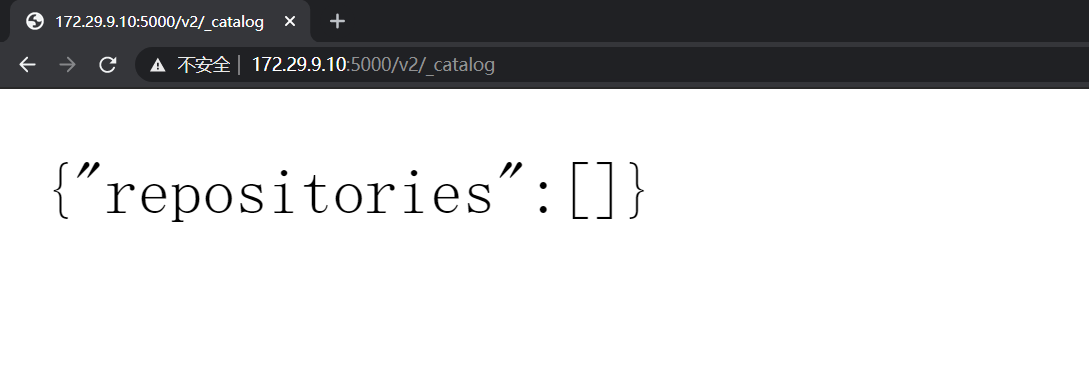
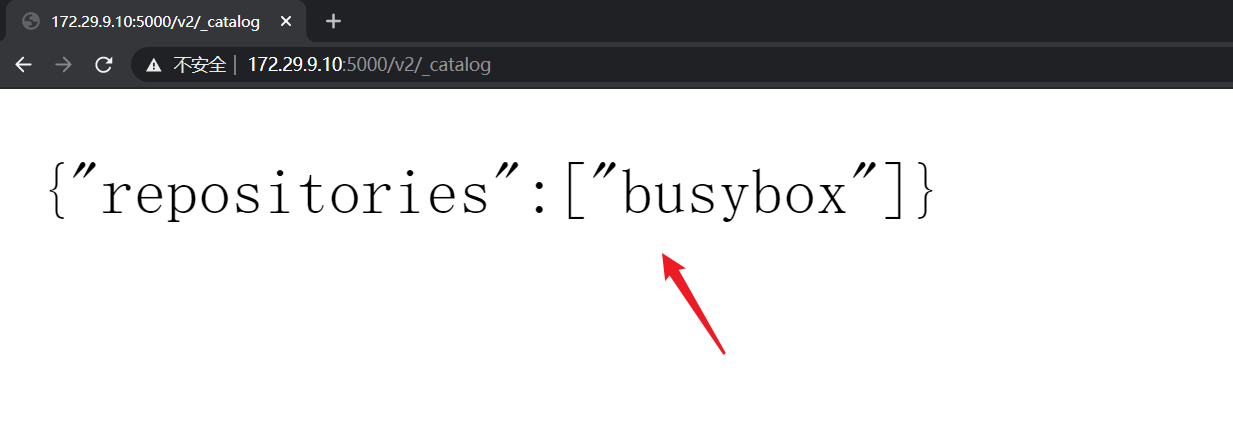
- 查看私有仓库中的镜像列表:
http://172.29.9.10:5000/v2/_catalog #发现,现在还是空的,后期上传了本地 docker 镜像到私有仓库中,就有数据了。
2、在docker上搭建 docker 服务并使用私有仓库
(1)启动docker
[root@docker ~]# systemctl start docker
[root@docker ~]# systemctl status docker(2)拉取busybox测试 镜像
从 Docker HUB 上拉取一个测试镜像,名字: busybox。
这边有2种方法可以拉取registry 镜像:
方法一:导入本地镜像
[root@docker ~]# ll -h busybox.tar
-r-------- 1 root root 1.3M 3月  26 2017 busybox.tar
[root@docker ~]# docker load -i busybox.tar
c0de73ac9968: Loading layer [==================================================>]  1.312MB/1.312MB
Loaded image: busybox:latest
[root@docker ~]#方法二: 在线拉取镜像
[root@docker ~]# docker pull busybox(3)查看busybox镜像
[root@docker ~]# docker images
REPOSITORY   TAG       IMAGE ID       CREATED       SIZE
busybox      latest    d3cd072556c2   11 days ago   1.24MB
[root@docker ~]#(4)创建镜像链接或为基础镜像打个标签(复制一个镜像并起一个名字)
语法: docker tag 原镜像名:标签 私有仓库地址/新镜像名:标签

[root@docker ~]# docker images #查看原来镜像
REPOSITORY   TAG       IMAGE ID       CREATED       SIZE
busybox      latest    d3cd072556c2   11 days ago   1.24MB
[root@docker ~]# docker tag busybox:latest 172.29.9.10:5000/busybox:latest #注: 不写镜像标签,默认是:latest
[root@docker ~]# docker images #再次查看镜像
REPOSITORY            TAG       IMAGE ID       CREATED       SIZE
172.29.9.10:5000/busybox   latest    d3cd072556c2   11 days ago   1.24MB
busybox               latest    d3cd072556c2   11 days ago   1.24MB
[root@docker ~]#(5)将刚新打好标签的 172.29.9.10:5000/busybox 镜像,push 到本地私有仓库中。
- 这里需要注意:此时需要修改 docker 配置文件,自定定 docker 镜像加速结点为:私有仓库的地址。
[root@docker ~]# vim /etc/docker/daemon.json #创建这个 daemon.json 文件,写入以下内容:
{
  "insecure-registries": [ "172.29.,9.10:5000" ]
}
[root@docker ~]#
#备注:
添加红色标记文字。 --insecure-registry 不安全的注册。这里的不安全指的是走 http 协议,要想安全传输镜像,需要使用 https 协议。我们的私有仓库一般是局域中使用,所以直接使用 http 协议就可以了。

[root@docker ~]# systemctl daemon-reload
[root@docker ~]# systemctl restart docker将刚新打好标签的 172.29.9.10:5000/busybox 镜像,push 到本地私有仓库中:
[root@docker ~]# docker push 172.29.9.10:5000/busybox
Using default tag: latest
The push refers to repository [172.29.9.10:5000/busybox]
d0d0905d7be4: Pushed
latest: digest: sha256:f3cfc9d0dbf931d3db4685ec659b7ac68e2a578219da4aae65427886e649b06b size: 527
[root@docker ~]#(6)登录 docker-registry上,查看镜像的存储目录和文件
注意:用docker images命令是看不到行推送过来的busybox镜像的;


(7)使用私有仓库中的镜像创建服务
初除镜像:
诧法: docker rmi 镜像名:标签
[root@docker ~]# docker images
REPOSITORY                 TAG       IMAGE ID       CREATED       SIZE
172.29.9.10:5000/busybox   latest    d3cd072556c2   11 days ago   1.24MB
busybox                    latest    d3cd072556c2   11 days ago   1.24MB
[root@docker ~]# docker rmi 172.29.9.10:5000/busybox #删除镜像
Untagged: 172.29.9.10:5000/busybox:latest
Untagged: 172.29.9.10:5000/busybox@sha256:f3cfc9d0dbf931d3db4685ec659b7ac68e2a578219da4aae65427886e649b06b
[root@docker ~]# docker images
REPOSITORY   TAG       IMAGE ID       CREATED       SIZE
busybox      latest    d3cd072556c2   11 days ago   1.24MB
[root@docker ~]#
[root@docker ~]# docker pull 172.29.9.10:5000/busybox #拉取镜像
Using default tag: latest
latest: Pulling from busybox
Digest: sha256:f3cfc9d0dbf931d3db4685ec659b7ac68e2a578219da4aae65427886e649b06b
Status: Downloaded newer image for 172.29.9.10:5000/busybox:latest
172.29.9.10:5000/busybox:latest
[root@docker ~]# docker images
REPOSITORY                 TAG       IMAGE ID       CREATED       SIZE
172.29.9.10:5000/busybox   latest    d3cd072556c2   11 days ago   1.24MB
busybox                    latest    d3cd072556c2   11 days ago   1.24MB
[root@docker ~]#使用新导入的镜像,运行一个新 docker 实例:
[root@docker ~]# docker run 172.29.9.10:5000/busybox echo "aaaa"
运行成功。
对刚才2台虚机做好快照!
3、总结
- 搭建私有仓库步骤:
1、把 registry 镜像导入 docker
2、基于 registry 镜像运行一个 docker 实例,registry 默认监听 5000 端口
- 导入镜像到私有仓库步骤:
1、安装 docker 服务
2、修改 docker 服务 镜像源,改成私有仓库地址: "insecure-registries":
[ "172.29.9.10:5000" ]
3、把要导入的镜像打个标签如: 172.29.9.10:5000/busybox:latest
4、上传打了标签的镜像到私有仓库: docker push 172.29.9.10:5000/busybox:latest
- 私有仓库的使用:
1、修改 docker 服务 镜像源,改成私有仓库地址: "insecure-registries":
[ "172.29.9.10:5000" ]
2、下载刚才上传的镜像 : docker pull 172.29.9.10:5000/busybox:latest
3、查看私有仓库中的镜像列表:http://172.29.9.10:5000/v2/_catalog
老规矩,贴上我的女神照片一张,祝大家生活开心,找到自己喜欢的事儿,我们下期再见。

关于我
我的博客主旨:
- 排版美观,语言精炼;
- 文档即手册,步骤明细,拒绝埋坑,提供源码;
- 本人实战文档都是亲测成功的,各位小伙伴在实际操作过程中如有什么疑问,可随时联系本人帮您解决问题,让我们一起进步!
🍀 微信二维码
x2675263825 (舍得), qq:2675263825。

🍀 微信公众号
《云原生架构师实战》

🍀 个人主页:

🍀 知识库:
https://onedayxyy.cn/docusaurus/
🍀 博客:
🍀 csdn
https://blog.csdn.net/weixin_39246554?spm=1010.2135.3001.5421
🍀 知乎
https://www.zhihu.com/people/foryouone
最后
好了,关于本次就到这里了,感谢大家阅读,最后祝大家生活快乐,每天都过的有意义哦,我们下期见!