
实战-centos上二进制离线安装docker-成功测试-20220804
实战:centos上二进制安装docker(成功测试) -2022.8.4
实验环境
1台centos7.7 1908虚机;(nat模式)
| 主机名 | ip | 系统版本 |
|---|---|---|
| docker-binary | 172.29.9.11 | CentOS 7.7.1908 |
- 注意:个人本次实验是从之前的初始化做好的centos7.7快照恢复过来的。
实验软件
百度云位置:docker-18.06.3-ce.tgz

0、基础环境准备
(1)关闭且禁用firewalld、NetworkManager、selinux服务
systemctl stop firewalld &systemctl disable  firewalld

systemctl stop NetworkManager
systemctl disable  NetworkManager

setenforce 0
sed -i s/SELINUX=enforcing/SELINUX=disabled/ /etc/selinux/config(2)配置网络yum源
cd /etc/yum.repos.d/
mkdir backup-`date +%F`
mv * !$

wget -O /etc/yum.repos.d/Centos-Base.repo http://mirrors.aliyun.com/repo/Centos-7.repo
yum clean all
yum makecache

yum install -y net-tools
yum install -y vim
yum install -y wget
yum install -y lrzsz(3)配置主机名
[root@hg ~]# hostnamectl --static set-hostname docker-binary
[root@hg ~]# exec bash
[root@docker-binary ~]#1、下载二进制安装包
[root@docker-binary ~]# wget https://mirrors.aliyun.com/docker-ce/linux/static/stable/x86_64/docker-18.06.3-ce.tgz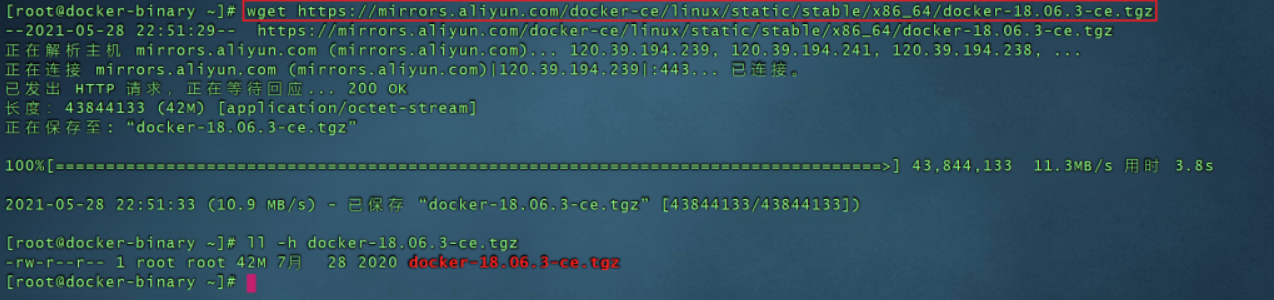
2、复制docker 二进制文件到/usr/bin目录下
[root@docker-binary ~]# ls
docker-18.06.3-ce.tgz
[root@docker-binary ~]# tar xf docker-18.06.3-ce.tgz
[root@docker-binary ~]# cd docker
[root@docker-binary docker]# ls
docker  docker-containerd  docker-containerd-ctr  docker-containerd-shim  dockerd  docker-init  docker-proxy  docker-runc
[root@docker-binary docker]# cp * /usr/bin/3、生成docker.service服务启动文件
cat > /usr/lib/systemd/system/docker.service <<EOF
[Unit]
Description=Docker Application Container Engine
Documentation=https://docs.docker.com
After=network-online.target firewalld.service
Wants=network-online.target

[Service]
Type=notify
# the default is not to use systemd for cgroups because the delegate issues still
# exists and systemd currently does not support the cgroup feature set required
# for containers run by docker
ExecStart=/usr/bin/dockerd -H tcp://0.0.0.0:2375 -H unix://var/run/docker.sock
ExecReload=/bin/kill -s HUP $MAINPID
# Having non-zero Limit*s causes performance problems due to accounting overhead
# in the kernel. We recommend using cgroups to do container-local accounting.
LimitNOFILE=infinity
LimitNPROC=infinity
LimitCORE=infinity
# Uncomment TasksMax if your systemd version supports it.
# Only systemd 226 and above support this version.
#TasksMax=infinity
TimeoutStartSec=0
# set delegate yes so that systemd does not reset the cgroups of docker containers
Delegate=yes
# kill only the docker process, not all processes in the cgroup
KillMode=process
# restart the docker process if it exits prematurely
Restart=on-failure
StartLimitBurst=3
StartLimitInterval=60s

[Install]
WantedBy=multi-user.target
EOF
4、启动docker服务并设置开机启动
[root@docker-binary ~]# systemctl daemon-reload
[root@docker-binary ~]# systemctl start docker
[root@docker-binary ~]# systemctl enable  docker
Created symlink from /etc/systemd/system/multi-user.target.wants/docker.service to /usr/lib/systemd/system/docker.service.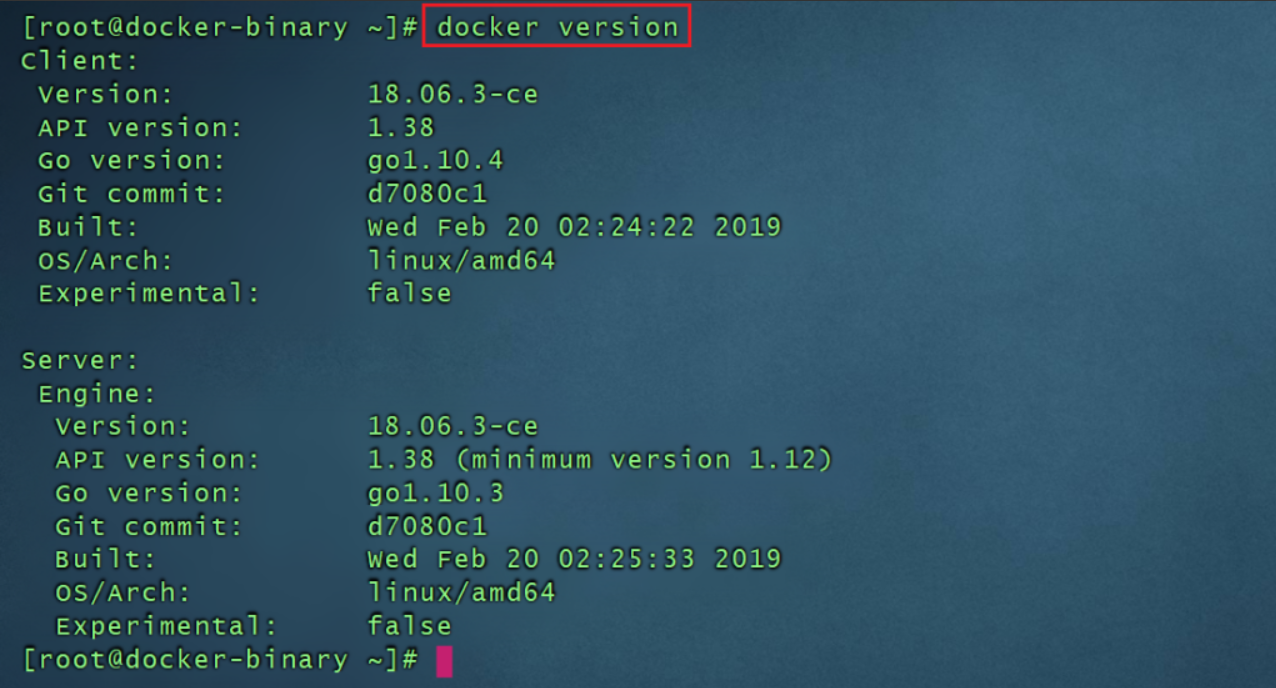
[root@docker-binary ~]#5、验证docker是否安装成功?
6、配置镜像加速
mkdir -p /etc/docker
tee /etc/docker/daemon.json <<-'EOF'
{
  "registry-mirrors": ["https://kvuwuws2.mirror.aliyuncs.com"]
}
EOF

systemctl daemon-reload
systemctl restart docker7、启动一个nginx容器,并验证效果:(符合预期效果)
[root@docker-binary ~]# docker pull nginx
Using default tag: latest
latest: Pulling from library/nginx
69692152171a: Pull complete
30afc0b18f67: Pull complete
596b1d696923: Pull complete
febe5bd23e98: Pull complete
8283eee92e2f: Pull complete
351ad75a6cfa: Pull complete
Digest: sha256:6d75c99af15565a301e48297fa2d121e15d80ad526f8369c526324f0f7ccb750
Status: Downloaded newer image for nginx:latest
[root@docker-binary ~]# docker images
REPOSITORY TAG IMAGE ID CREATED SIZE
nginx latest d1a364dc548d 2 days ago 133MB
[root@docker-binary ~]# docker run -d -p 80:80 nginx
f6788d53c01978b1520956bce07ed2a9ab5cc042189d13174eead774bedb7178
[root@docker-binary ~]# docker ps
CONTAINER ID IMAGE COMMAND CREATED STATUS PORTS NAMES
f6788d53c019 nginx "/docker-entrypoint.…" 7 seconds ago Up 6 seconds 0.0.0.0:80->80/tcp romantic_jepsen
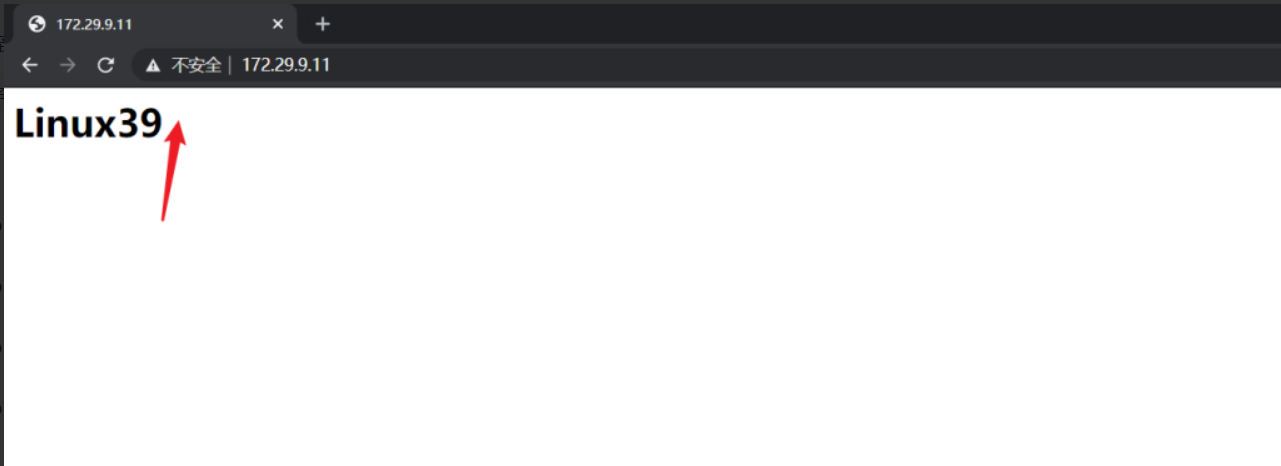
[root@docker-binary ~]# docker exec -it f6788d53c019 bash
root@f6788d53c019:/# echo "<h1>Linux39</h1>" > /usr/share/nginx/html/index.html
root@f6788d53c019:/#自己笔记本浏览器输入:http://172.29.9.11/验证效果。
需要注意的问题
(1) 关于路由转发功能问题思考
默认情况,ipv4的路由转发功能是关闭的,即cat /proc/sys/net/ipv4/ip_forward默认为1;
但是一旦docker服务被安装后,这个路由转发功能会被开启的,但是cat /etc/sysctl.conf 文件里没有配置相关内容,感觉像是临时生效的(其实是永久生效的)。

这边进行测试下:

重启宿主机,查看效果:
init 6虚机重启后现象:
虚机重启后,原来的容器停止了; 但这个cat /proc/sys/net/ipv4/ip_forward的内容依然为1; 此时docker服务时启动的; 关闭docker服务后,这个内容依然为1;


很奇怪,应该是自己对这方面的知识哪里有盲区,这个问题暂且搁置。
个人建议,最好手动配置永久生效:
#永久生效方法:
[root@docker-binary ~]# echo "net.ipv4.ip_forward = 1" >> /etc/sysctl.conf
[root@docker-binary ~]# sysctl -p #生效net.ipv4.ip_forward = 1
[root@docker-binary ~]# cat /proc/sys/net/ipv4/ip_forward #查看,1代表开启网络路由转发功能1
(2) docker二进制安装文件下载地址
https://download.docker.com/linux/static/stable/x86_64/ #docker官网
https://mirrors.aliyun.com/docker-ce/linux/static/stable/x86_64/ #阿里云镜像地址(推荐)

关于我
我的博客主旨:
- 排版美观,语言精炼;
- 文档即手册,步骤明细,拒绝埋坑,提供源码;
- 本人实战文档都是亲测成功的,各位小伙伴在实际操作过程中如有什么疑问,可随时联系本人帮您解决问题,让我们一起进步!
🍀 微信二维码 x2675263825 (舍得), qq:2675263825。

🍀 微信公众号 《云原生架构师实战》

🍀 个人博客站点
http://47.97.48.237/ (即将上线域名:onedayxyy.cn)

🍀 语雀
https://www.yuque.com/xyy-onlyone

🍀 csdn https://blog.csdn.net/weixin_39246554?spm=1010.2135.3001.5421

🍀 知乎 https://www.zhihu.com/people/foryouone

最后
好了,关于本次就到这里了,感谢大家阅读,最后祝大家生活快乐,每天都过的有意义哦,我们下期见!
