
实战-ubuntu在线安装docker-成功测试-20220804
实战:ubuntu上安装docker-2022.8.4(成功测试)

目录
[toc]
前言
- 本人博客宗旨
bash
1.本人提供的实战文档过程超详细,拿着我的博客,每个人最终都可以成功测试出实验现象,完全避免网上的一些埋着很多坑的博客(特别浪费时间,个人深有感触);
2.博客排版美观、组织语言简明扼要;
3.提供实验涉及软件、源码;
4.实验过程如有遇到任何问题或者文章中有任何不足之处,欢迎留言或随时联系鄙人,微信:x2675263825,QQ:2675263825,在it学习的道路上,让我们一起共同成长!实验环境
0、前期环境准备
| 系统版本 | 主机名 | ip |
|---|---|---|
| ubuntu1804-docker | ubuntu1804-docker | 172.29.9.9 |
bash
备注:
1台linux虚机,ubuntu系统版本:18.04.5 LTS (Bionic Beaver) #cat /etc/os-release- 配置ip:虚机网络为nat,保证可以ping通百度;
bash
root@ubuntu1804-docker:~# vim /etc/netplan/01-netcfg.yaml
# This file describes the network interfaces available on your system
# For more information, see netplan(5).
network:
  version: 2
  renderer: networkd
  ethernets:
    eth0:
      dhcp4: no
      dhcp6: no
      addresses: [172.29.9.9/16]
      gateway4: 172.29.0.254
      nameservers:
        addresses: [223.6.6.6]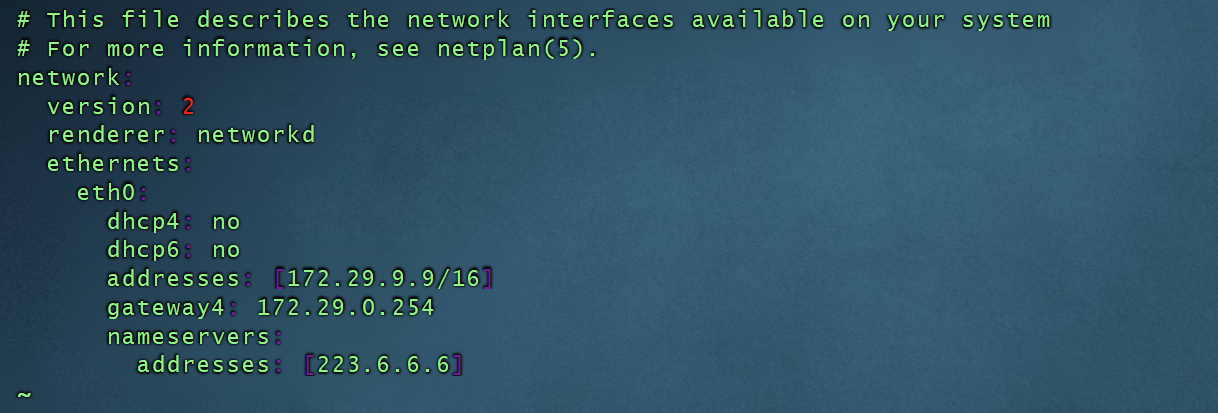
可通百度:

- 配置软件源为国内阿里云的
bash
root@ubuntu1804-docker:~# vim /etc/apt/sources.list
deb http://mirrors.aliyun.com/ubuntu/ bionic main restricted universe multiverse
deb-src http://mirrors.aliyun.com/ubuntu/ bionic main restricted universe multiverse

deb http://mirrors.aliyun.com/ubuntu/ bionic-security main restricted universe multiverse
deb-src http://mirrors.aliyun.com/ubuntu/ bionic-security main restricted universe multiverse

deb http://mirrors.aliyun.com/ubuntu/ bionic-updates main restricted universe multiverse
deb-src http://mirrors.aliyun.com/ubuntu/ bionic-updates main restricted universe multiverse

deb http://mirrors.aliyun.com/ubuntu/ bionic-proposed main restricted universe multiverse
deb-src http://mirrors.aliyun.com/ubuntu/ bionic-proposed main restricted universe multiverse

deb http://mirrors.aliyun.com/ubuntu/ bionic-backports main restricted universe multiverse
deb-src http://mirrors.aliyun.com/ubuntu/ bionic-backports main restricted universe multiverse
- 主机名配置
bash
root@ubuntu1804-template:~# hostnamectl --static set-hostname ubuntu1804-docker
root@ubuntu1804-template:~# exec bash
root@ubuntu1804-docker:~#- 注意:此时对做好初始化的虚机做一个快照!

1、卸载旧版本docker(如果存在的话)
bash
root@ubuntu1804-docker:~# apt-get remove docker docker-engine docker.io containerd runc
2、安装必要的一些系统工具
bash
root@ubuntu1804-docker:~# sudo apt-get update
root@ubuntu1804-docker:~# sudo apt-get -y install apt-transport-https ca-certificates curl software-properties-common3、安装GPG证书
bash
root@ubuntu1804-docker:~# curl -fsSL https://mirrors.aliyun.com/docker-ce/linux/ubuntu/gpg | sudo apt-key add -
4、写入软件源信息
bash
root@ubuntu1804-docker:~# sudo add-apt-repository "deb [arch=amd64] https://mirrors.aliyun.com/docker-ce/linux/ubuntu $(lsb_release -cs) stable"

5、更新并安装Docker-CE
bash
root@ubuntu1804-docker:~# sudo apt-get update

#开始安装docker-ce
#这里需要注意:如果要装固定版本的docker,改如何装呢?(不指定版本的话,默认是安装的是最新版本)
#注意:docker-ce是服务端,docker-ce-cli是客户端;(1)默认是安装的是最新版本
bash
root@ubuntu1804-docker:~# sudo apt-get -y install docker-ce docker-ce-cli(2)安装固定版本的docker
bash
step1:查找Docker-CE的版本
root@ubuntu1804-docker:~# apt-cache madison docker-ce
amd64 Packages
 docker-ce | 5:19.03.0~3-0~ubuntu-bionic | https://mirrors.aliyun.com/docker-ce/linux/ubuntu bionic/stable amd64 Packages
 docker-ce | 5:18.09.9~3-0~ubuntu-bionic | https://mirrors.aliyun.com/docker-ce/linux/ubuntu bionic/stable amd64 Packages
 docker-ce | 5:18.09.8~3-0~ubuntu-bionic | https://mirrors.aliyun.com/docker-ce/linux/ubuntu bionic/stable
……
root@ubuntu1804-docker:~# apt-cache madison docker-ce-cli
docker-ce-cli | 5:19.03.1~3-0~ubuntu-bionic | https://mirrors.aliyun.com/docker-ce/linux/ubuntu bionic/stable amd64 Packages
docker-ce-cli | 5:19.03.0~3-0~ubuntu-bionic | https://mirrors.aliyun.com/docker-ce/linux/ubuntu bionic/stable amd64 Packages
docker-ce-cli | 5:18.09.9~3-0~ubuntu-bionic | https://mirrors.aliyun.com/docker-ce/linux/ubuntu bionic/stable amd64 Packages
docker-ce-cli | 5:18.09.8~3-0~ubuntu-bionic | https://mirrors.aliyun.com/docker-ce/linux/ubuntu bionic/stable
……


step2:安装指定版本的Docker-CE
#本次安装如下版本的docker-ce:
docker-ce | 5:19.03.9~3-0~ubuntu-bionic
docker-ce-cli | 5:19.03.9~3-0~ubuntu-bionic
root@ubuntu1804-docker:~# apt install docker-ce=5:19.03.9~3-0~ubuntu-bionic docker-ce-cli=5:19.03.9~3-0~ubuntu-bionic6、安装验证
bash
root@ubuntu1804-docker:~# docker version
Client: Docker Engine - Community
 Version:           19.03.9 #
 API version:       1.40
 Go version:        go1.13.10
 Git commit:        9d988398e7
 Built:             Fri May 15 00:25:18 2020
 OS/Arch:           linux/amd64
 Experimental:      false

Server: Docker Engine - Community
 Engine:
  Version:          19.03.9 #
  API version:      1.40 (minimum version 1.12)
  Go version:       go1.13.10
  Git commit:       9d988398e7
  Built:            Fri May 15 00:23:50 2020
  OS/Arch:          linux/amd64
  Experimental:     false
 containerd:
  Version:          1.4.3
  GitCommit:        269548fa27e0089a8b8278fc4fc781d7f65a939b
 runc:
  Version:          1.0.0-rc92
  GitCommit:        ff819c7e9184c13b7c2607fe6c30ae19403a7aff
 docker-init:
  Version:          0.18.0
  GitCommit:        fec3683
root@ubuntu1804-docker:~#7、开启docker,并设置开机自启
bash
root@ubuntu1804-docker:~# systemctl enable --now docker
Synchronizing state of docker.service with SysV service script with /lib/systemd/systemd-sysv-install.
Executing: /lib/systemd/systemd-sysv-install enable docker
root@ubuntu1804-docker:~#8、配置阿里云 docker 镜像加速器
bash
sudo mkdir -p /etc/docker
sudo tee /etc/docker/daemon.json <<EOF
{
    "registry-mirrors": [
        "https://hub.uuuadc.top",
        "https://docker.anyhub.us.kg",
        "https://dockerhub.jobcher.com",
        "https://dockerhub.icu",
        "https://docker.ckyl.me",
        "https://docker.awsl9527.cn"
    ]
}
EOF
sudo systemctl daemon-reload
sudo systemctl restart docker9、实例:拉取一个nginx镜像运行起来并观看效果
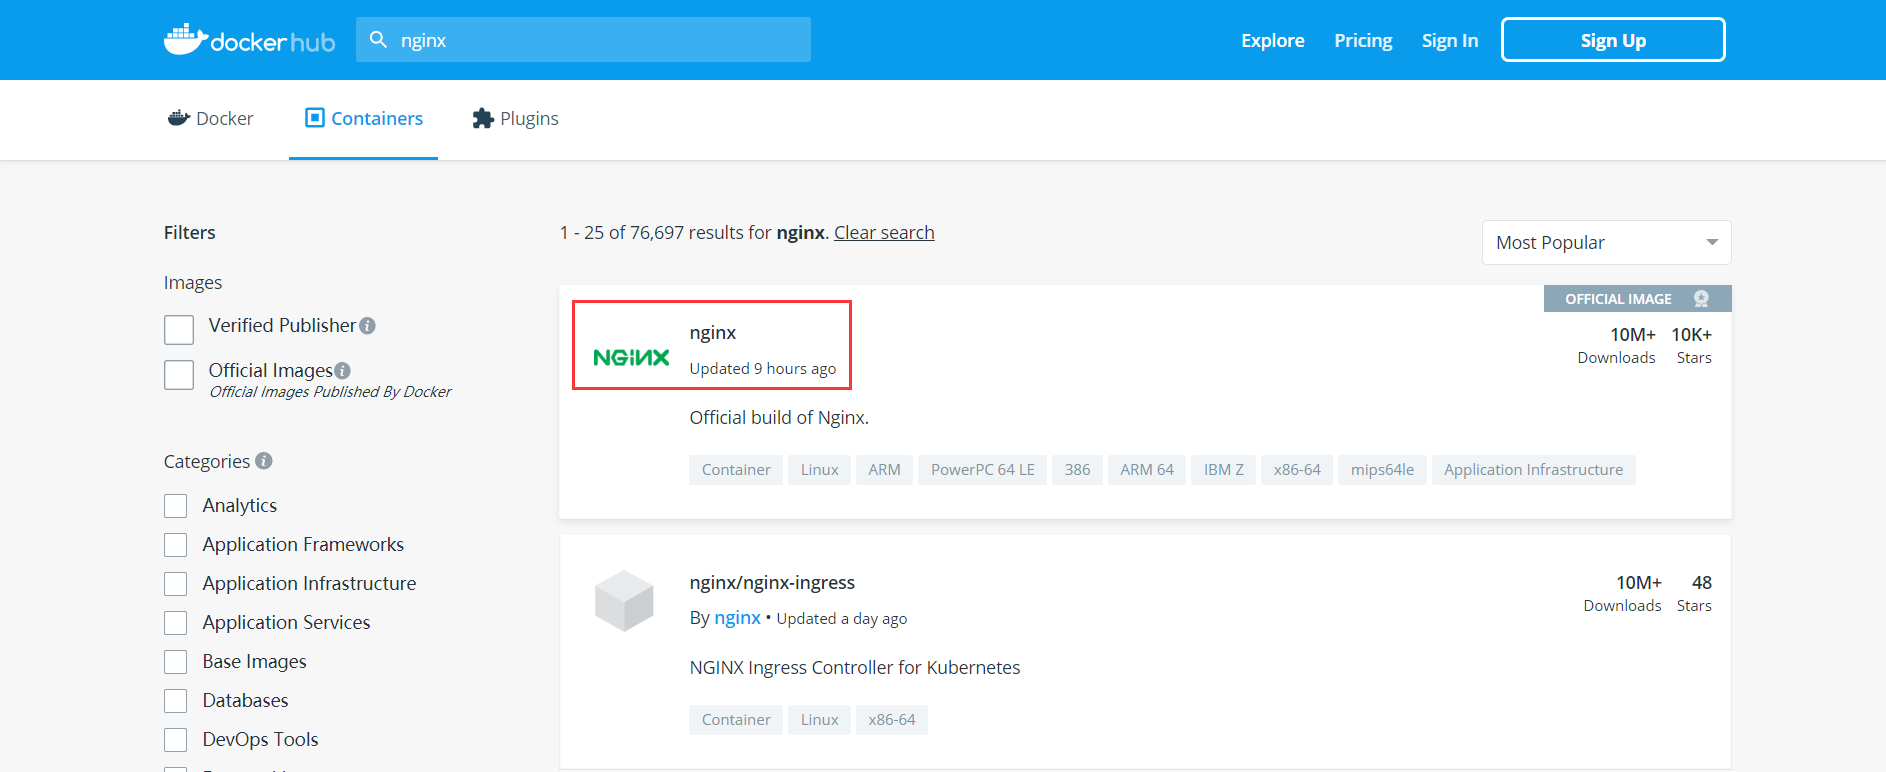
到hub.docker.com网站,输入nginx,点击Tag,寻找相应版本的nginx镜像,找到后点击复制,直接粘贴在linux下即可拉取nginx镜像:
https://hub.docker.com/ 本次安装nginx:1.16.1版本:

docker pull nginx:1.16.1

bash
root@ubuntu1804-docker:~# docker pull nginx:1.16.1 #这个是从官方下载镜像的(下载速度还是可以接受的,但有时候就很慢。。。。),后期可以采取方法加速从官方dockerhub下载慢的问题的。
1.16.1: Pulling from library/nginx
54fec2fa59d0: Pull complete
5546cfc92772: Pull complete
50f62e3cdaf7: Pull complete
Digest: sha256:d20aa6d1cae56fd17cd458f4807e0de462caf2336f0b70b5eeb69fcaaf30dd9c
Status: Downloaded newer image for nginx:1.16.1
docker.io/library/nginx:1.16.1
root@ubuntu1804-docker:~#

root@ubuntu1804-docker:~# docker images #查看下载好的nginx镜像
REPOSITORY          TAG                 IMAGE ID            CREATED             SIZE
nginx               1.16.1              dfcfd8e9a5d3        10 months ago       127MB

root@ubuntu1804-docker:~#docker run -d -p 80:80 nginx:1.16.1 #-d代表后台,宿主机端口:容器端口 先在本地找,本地不存在的话,就去官网下载(docker.hub.com)
5d5e1cb592166d07155813b237b49d832ee8f13c1d30c060d826da91205d704c
root@ubuntu1804-docker:~#

root@ubuntu1804-docker:~# docker ps #查看正在运行的容器
CONTAINER ID        IMAGE               COMMAND                  CREATED             STATUS              PORTS                NAMES
5d5e1cb59216        nginx:1.16.1        "nginx -g 'daemon of…"   27 seconds ago      Up 25 seconds       0.0.0.0:80->80/tcp   elastic_bardeen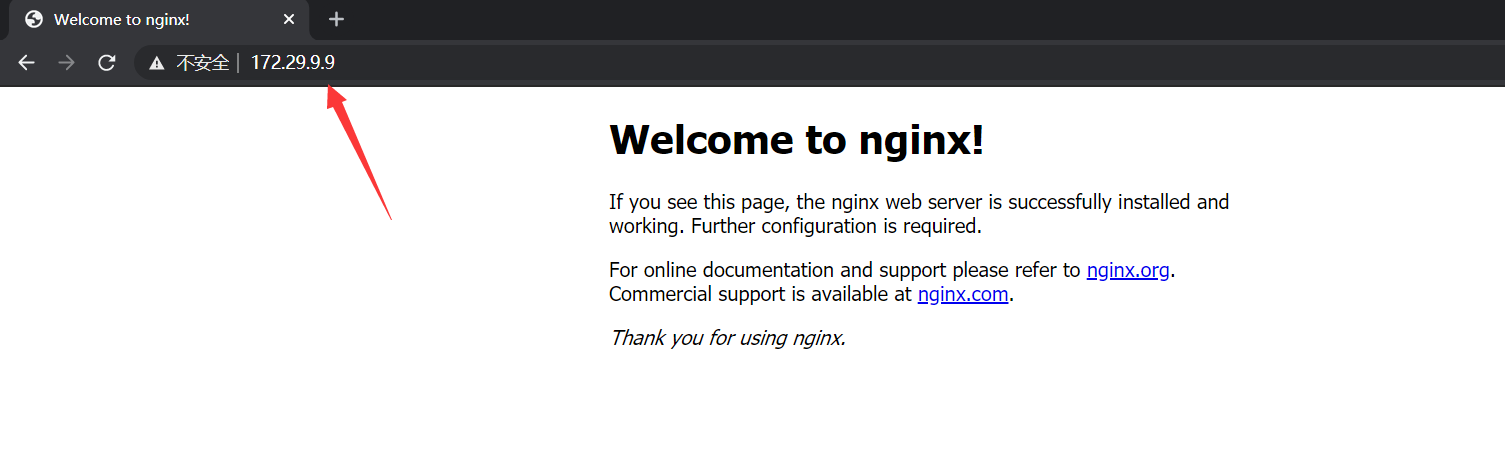
root@ubuntu1804-docker:~#此时在宿主机上访问这个地址,查看效果:
此时,如何知道这个是我们的容器呢? 可以通过进入刚才创建的容器,命令修改nginx index.html文件,来验证:
bash
root@ubuntu1804-docker:~# docker ps
CONTAINER ID        IMAGE               COMMAND                  CREATED             STATUS              PORTS                NAMES
5d5e1cb59216        nginx:1.16.1        "nginx -g 'daemon of…"   3 minutes ago       Up 3 minutes        0.0.0.0:80->80/tcp   elastic_bardeen
root@ubuntu1804-docker:~# docker exec -it 5d5e1cb59216 bash #-i代表标准输入,t代表tty
root@5d5e1cb59216:/#
root@5d5e1cb59216:/# pwd
/
root@5d5e1cb59216:/# cat /etc/issue #查看容器系统是debaian的
Debian GNU/Linux 10 \n \l

root@5d5e1cb59216:/# apt update #更新一下软件源 (这个有点费时间,且后面这个操作不需要更新软件源的,此时直接ctrl c杀死刚才那个进程就好)
root@5d5e1cb59216:/# pwd
/
root@5d5e1cb59216:/# cd /usr/share/nginx/html/
root@5d5e1cb59216:/usr/share/nginx/html# ls -l
total 8
-rw-r--r-- 1 root root 494 Aug 13  2019 50x.html
-rw-r--r-- 1 root root 612 Aug 13  2019 index.html
root@5d5e1cb59216:/usr/share/nginx/html# cat index.html
<!DOCTYPE html>
<html>
<head>
<title>Welcome to nginx!</title>
<style>
    body {
        width: 35em;
        margin: 0 auto;
        font-family: Tahoma, Verdana, Arial, sans-serif;
    }
</style>
</head>
<body>
<h1>Welcome to nginx!</h1>
<p>If you see this page, the nginx web server is successfully installed and
working. Further configuration is required.</p>

<p>For online documentation and support please refer to
<a href="http://nginx.org/">nginx.org</a>.<br/>
Commercial support is available at
<a href="http://nginx.com/">nginx.com</a>.</p>

<p><em>Thank you for using nginx.</em></p>
</body>
</html>
root@5d5e1cb59216:/usr/share/nginx/html#
root@5d5e1cb59216:/usr/share/nginx/html# echo "Linux39" > index.html #修改nginx index.html文件此时再次在宿主机上刷新网页观看效果(符合预期):

- 此时,再对安装好docker环境的虚机做一个快照!

实验到此结束!
总结
以上就是关于如何在ubuntu1804上安装docker的方法了,感谢阅读。